Best Hikes to do in Mount Aso National Park, Japan

Before arriving in Mount Aso, we spent hours researching the best hikes and trying to figure out exactly how to do them. Surprisingly, there isn’t a lot of detailed information available online, so after completing these hikes ourselves, we wanted to put together the guide that we wish we had when planning our trip.
To be honest, hiking in Mount Aso completely exceeded our expectations. The landscapes here felt unlike anything else we experienced in Japan, with massive volcanic craters, rugged peaks, and endless grasslands that looked more like something we’d expect to find in Iceland or New Zealand. On our first trip to Japan, we followed the classic route through Tokyo, Kyoto, Osaka, and the Izu Peninsula, but our time in Mount Aso ended up being one of the most unforgettable experiences in Japan.
So, if you’re planning a visit to Kyushu and want to experience the region’s incredible landscapes, here are the hikes we recommend, what to expect on each trail, and a few tips we learned along the way!
Why Hike in Mount Aso National Park
While planning our trip to Mount Aso, we knew we wanted to tackle a few hikes around the volcanic landscape. What we didn’t expect was just how spectacular and diverse those hikes would be. Having hiked all over the world, from the depths of Colca Canyon in Peru to the jagged peaks of the Dolomites and even the iconic hikes of Patagonia, we don’t say this lightly: the hiking around Mount Aso completely exceeded our expectations. The scenery was unlike anything we had experienced before, and it quickly became one of the most memorable hikes we’ve ever done.
What made hiking in Mount Aso National Park special was the incredible diversity of the landscapes, the accessibility of these hikes, the wow factor in a short hike duration, and finally how it can be done comfortably.
Diversity of Landscapes
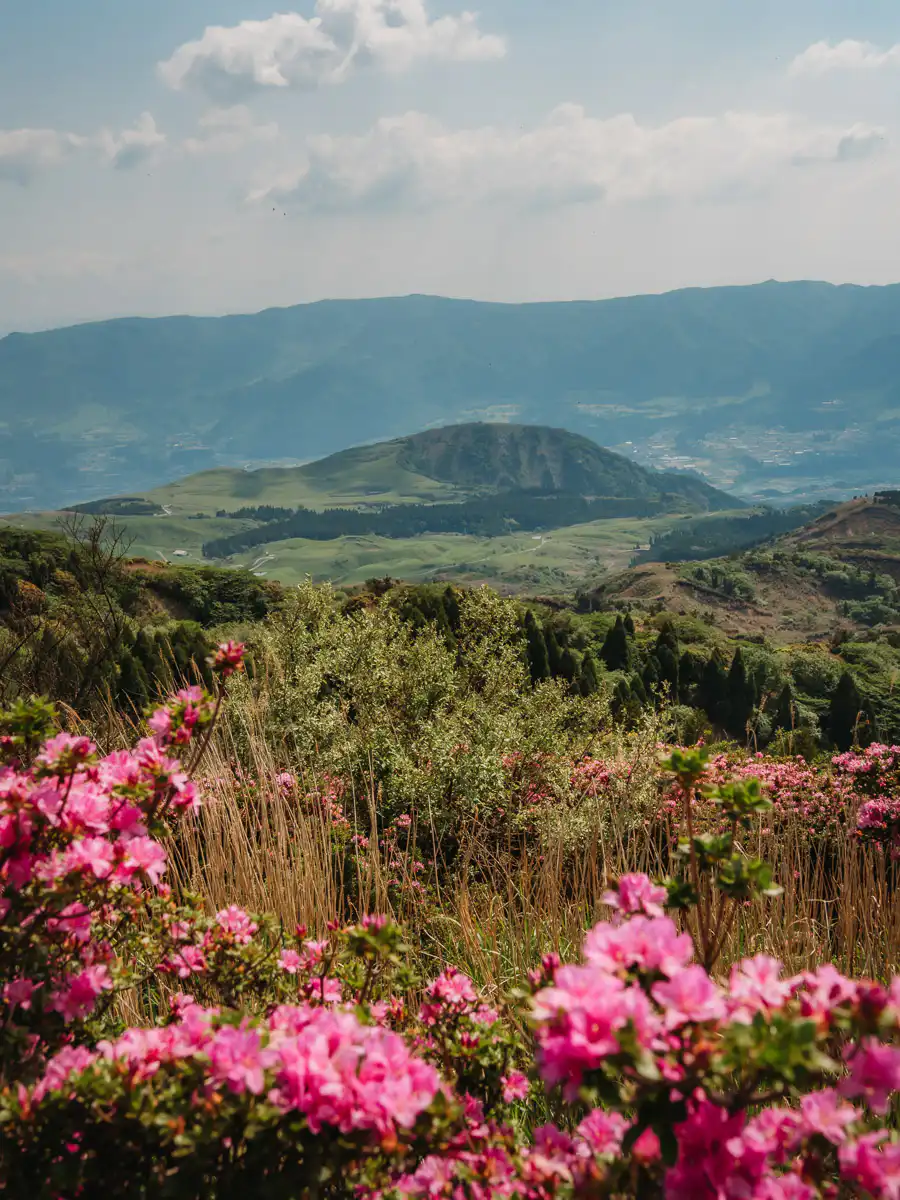
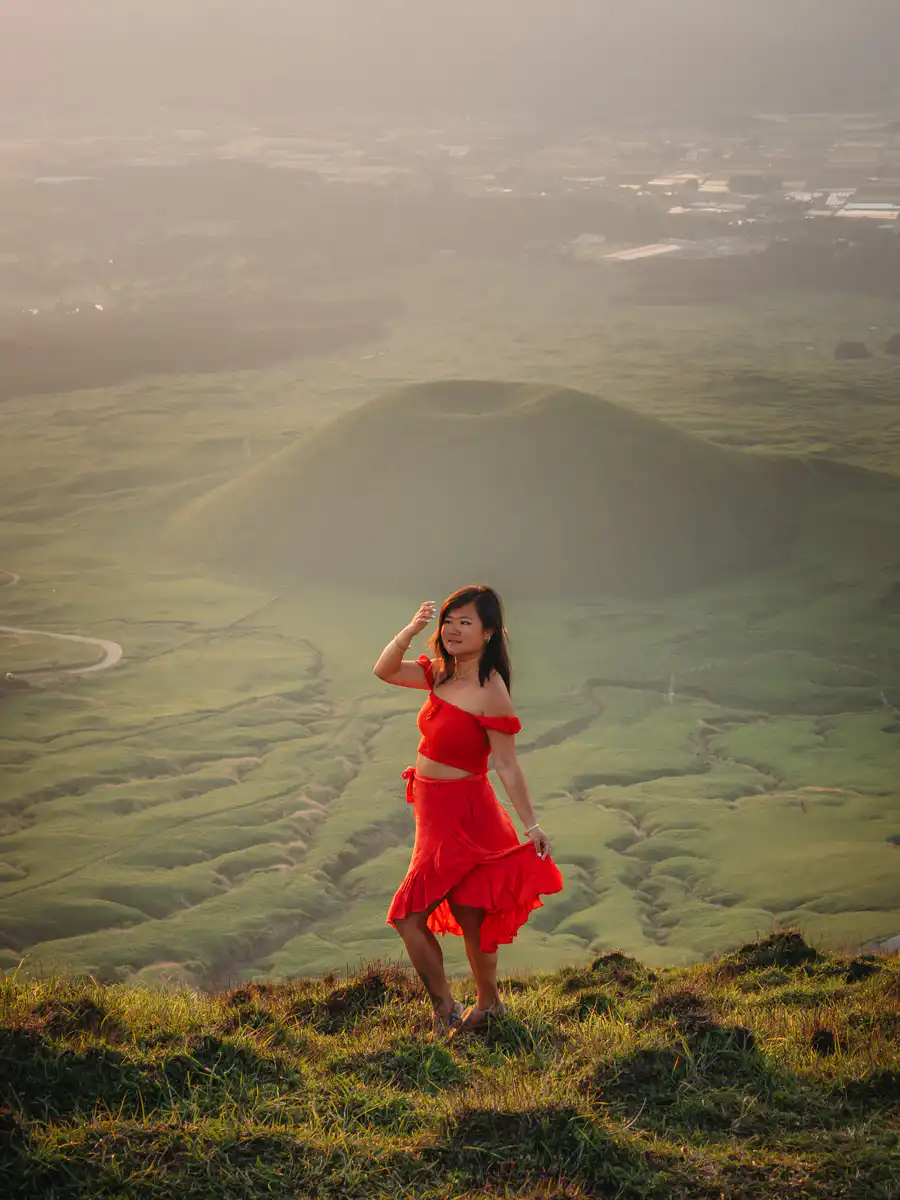
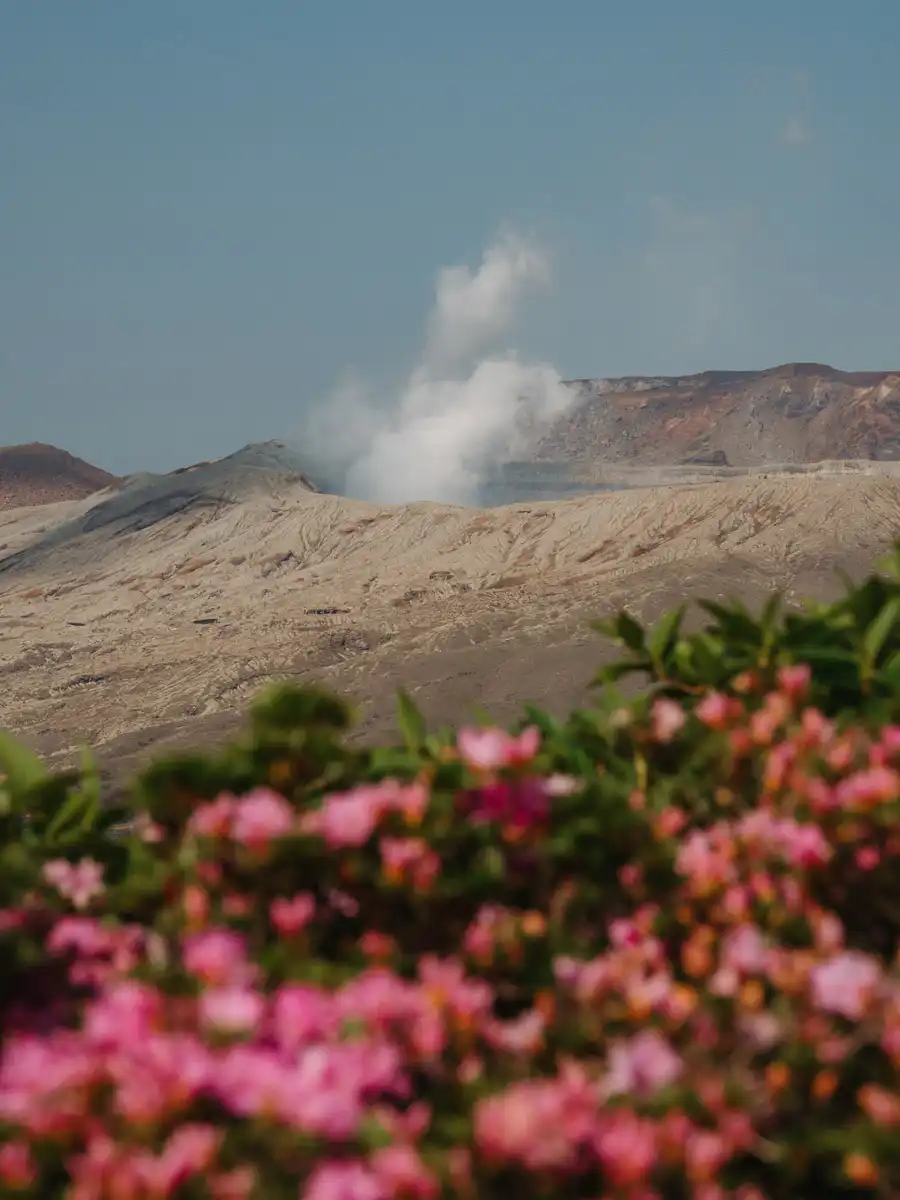
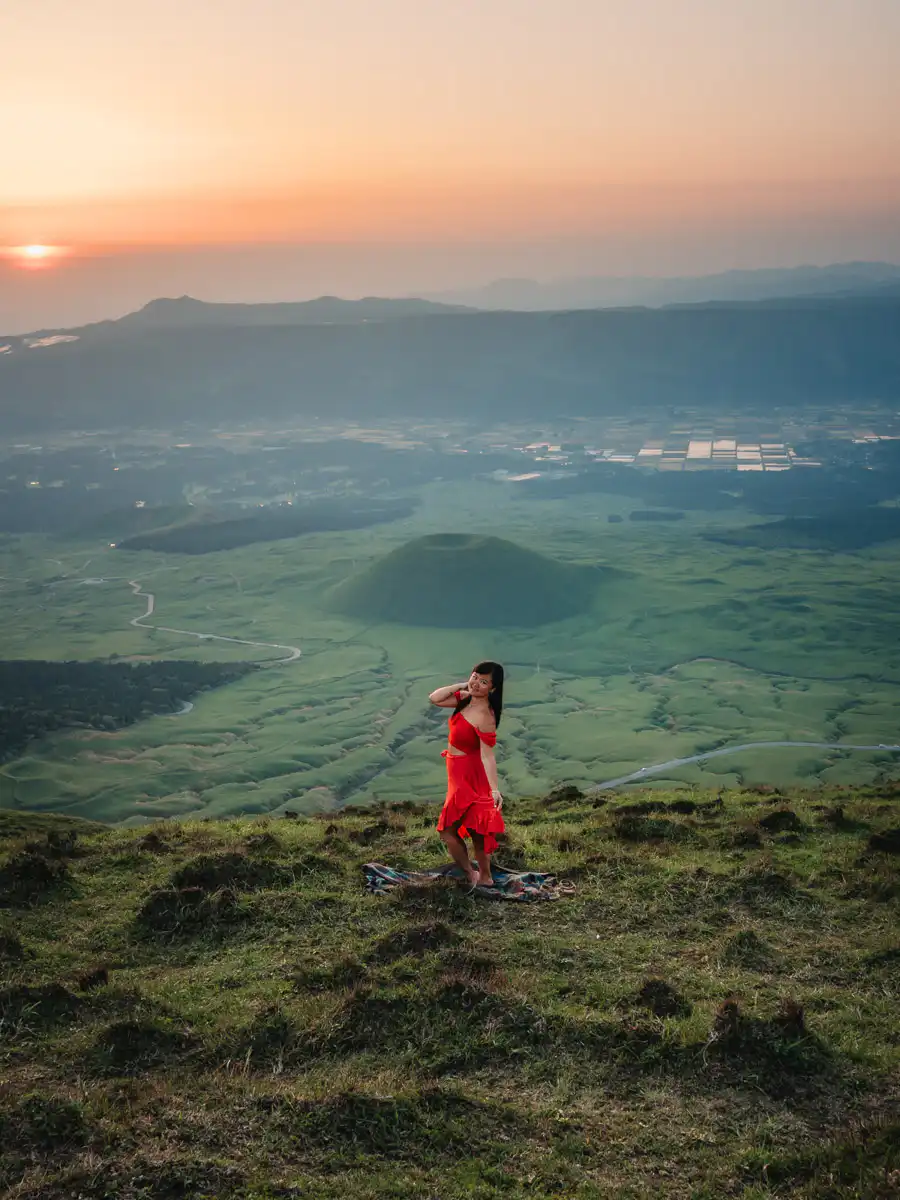
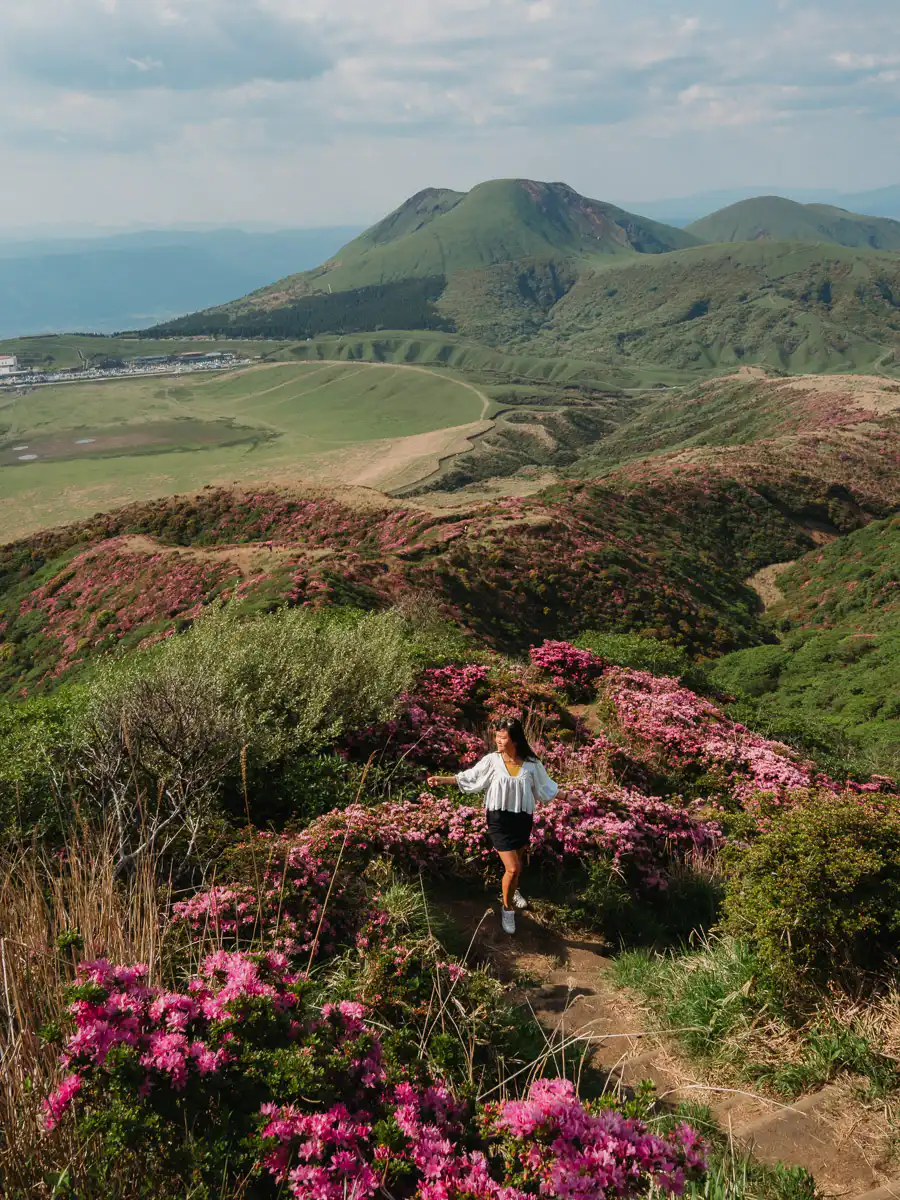
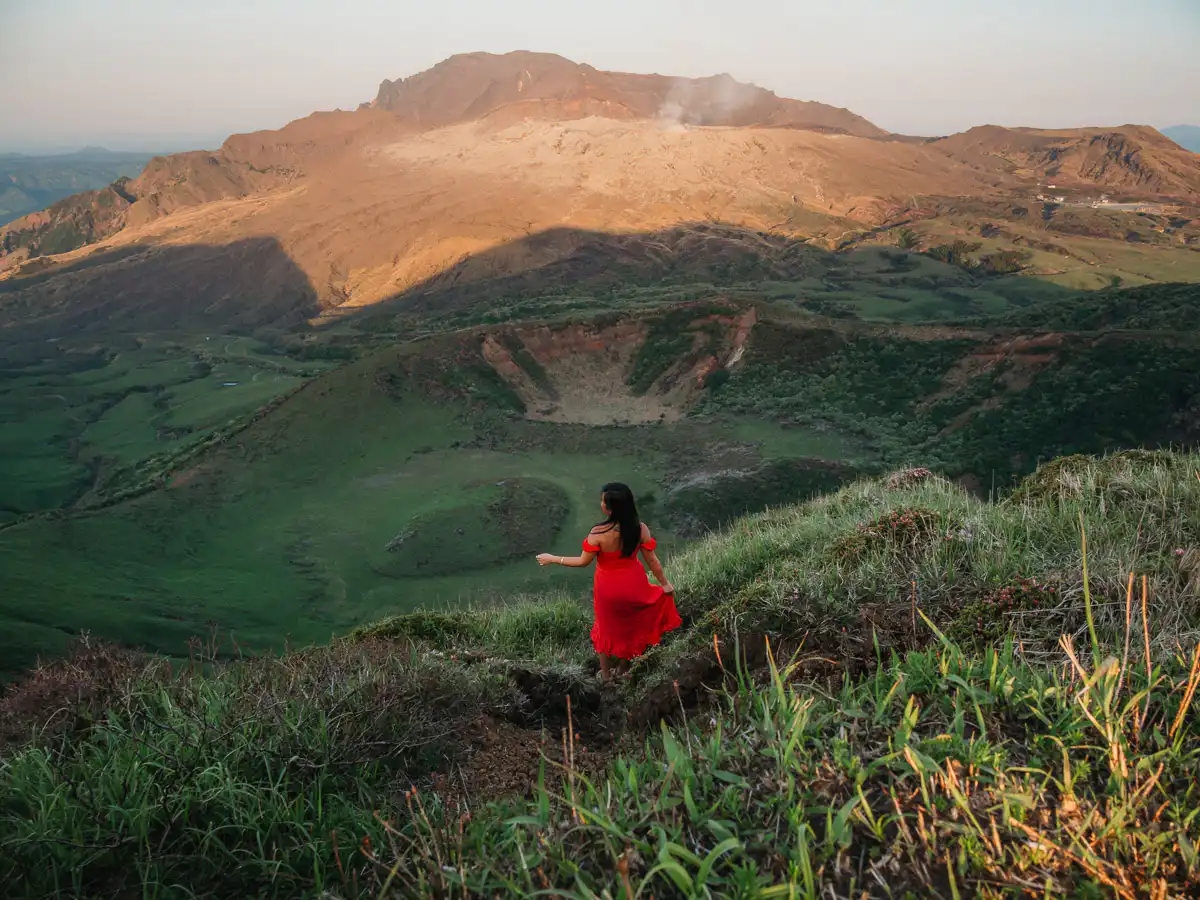
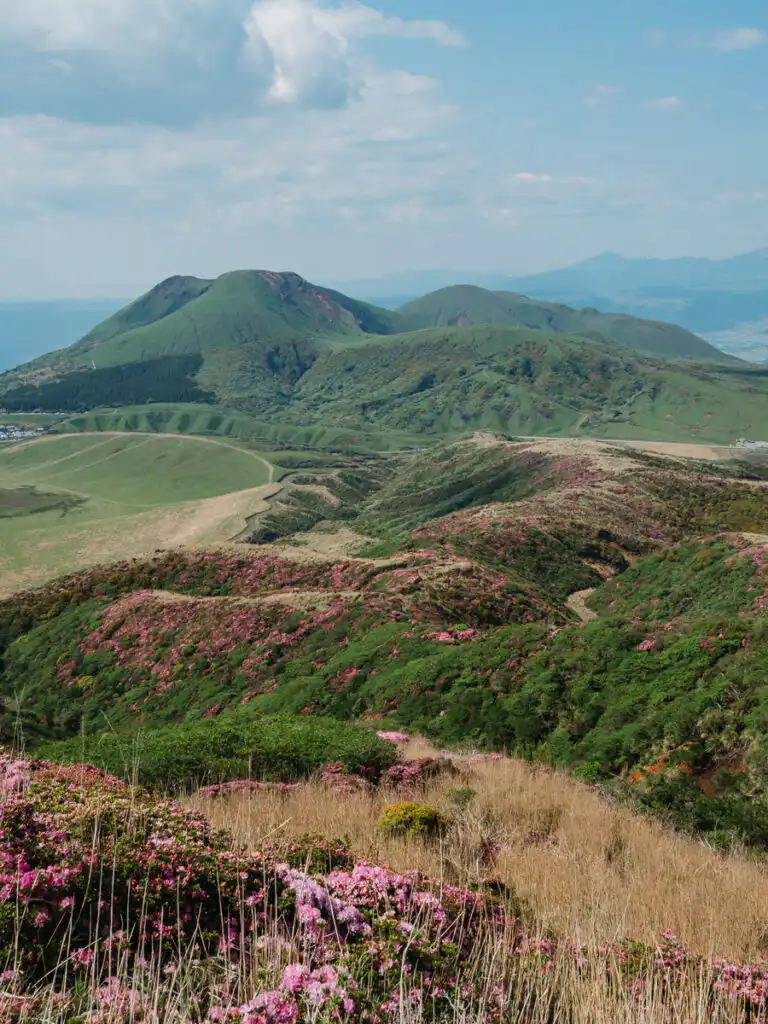
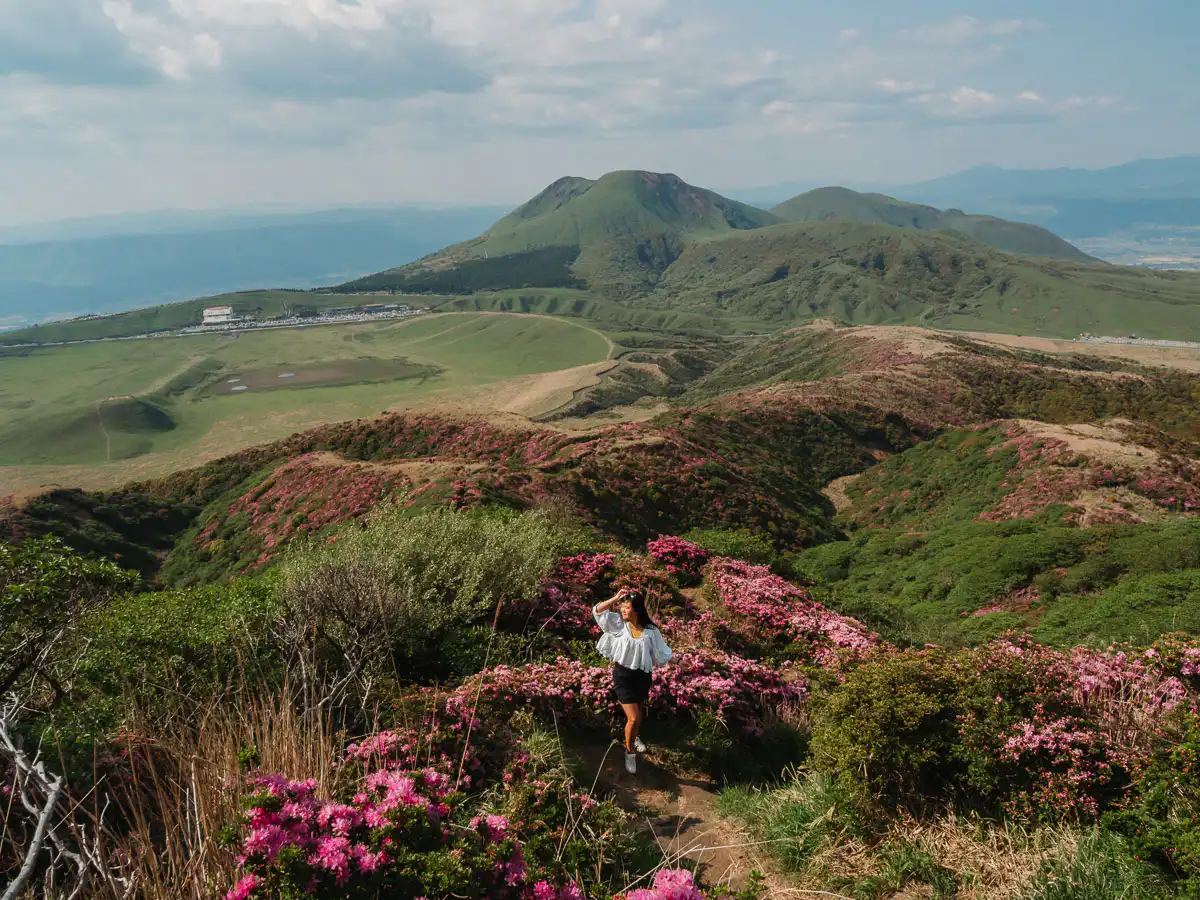
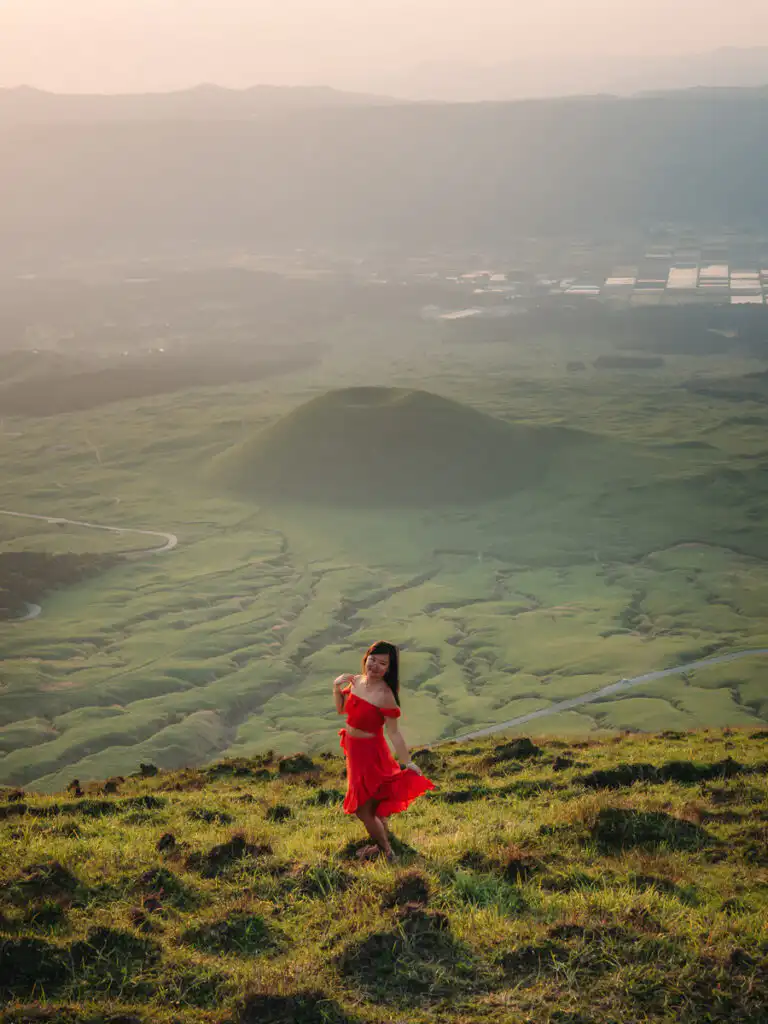
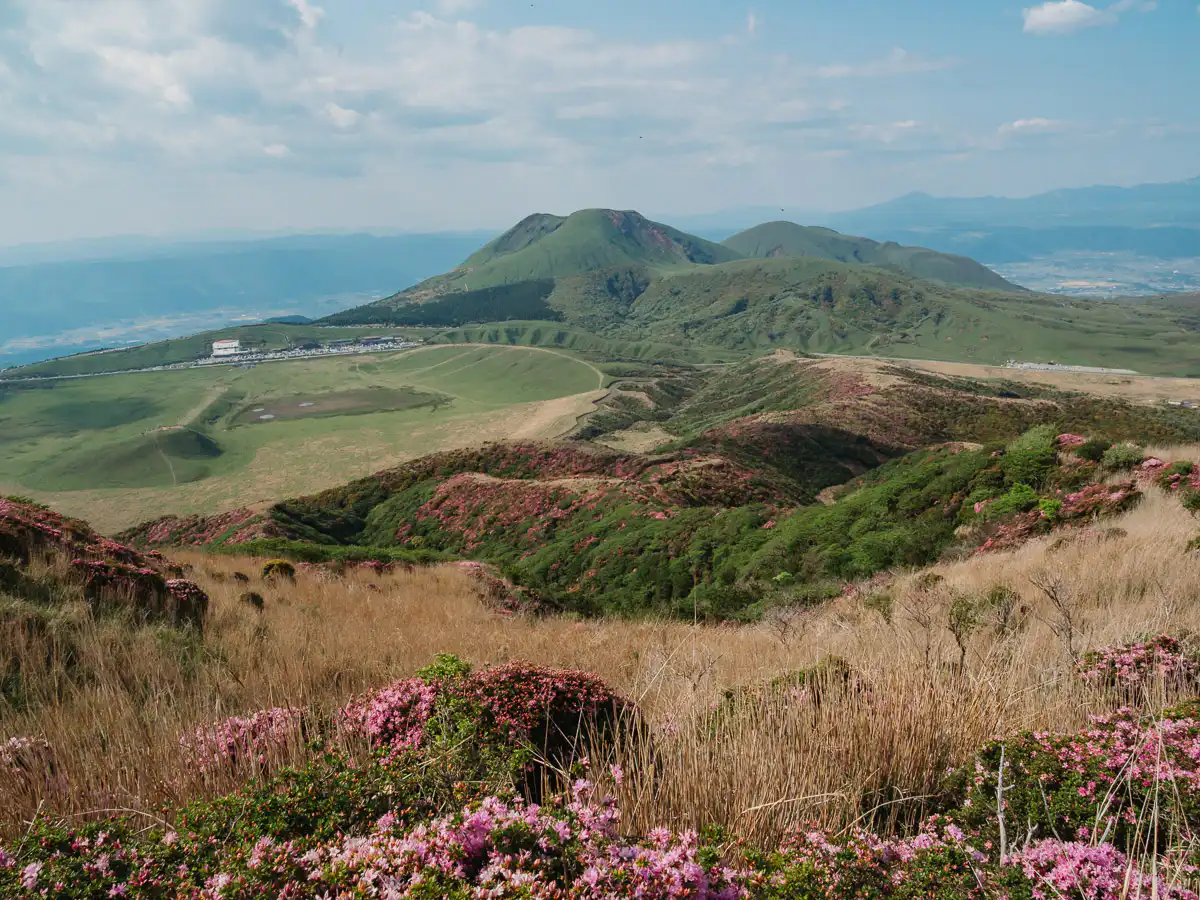
First, we loved the diversity, from our favourite sunset spot above Mount Kishimadake overlooking the unique Komezuka green volcano, the stunning pink flowers covering Sensuikyo Gorge, to hiking right along the rim overlooking the Aso crater.
Super Accessible Hikes
Next, these hikes are super accessible. Just a 15-20 minutes drive from Aso, there is a parking lot, and many of the hikes can be done within 2 hours. The hikes can also be accomplished comfortably as day trips, without worrying about high altitude, cold, or dangerous unmarked trails.
Huge wow-factor
Finally, the hikes here pack a huge wow-factor within the 2-3 hours distance. No more hiking for 10 hours just to reach one viewpoint. Nan even said that the Eboshidake hike was one of our favourite small hikes ever!
Best Hikes in Mount Aso, Kyushu | ||||
Hike | Difficulty | Time | Distance | Best For |
Mt. Eboshidake | Moderate | 2.5 Hours | 3.9 Km | Scenic views, pink Azaleas, incredibly varied landscape |
Mt. Kishimadake | Easy | 2 Hours | 3.5 Km | Beginners, our favourite sunset view |
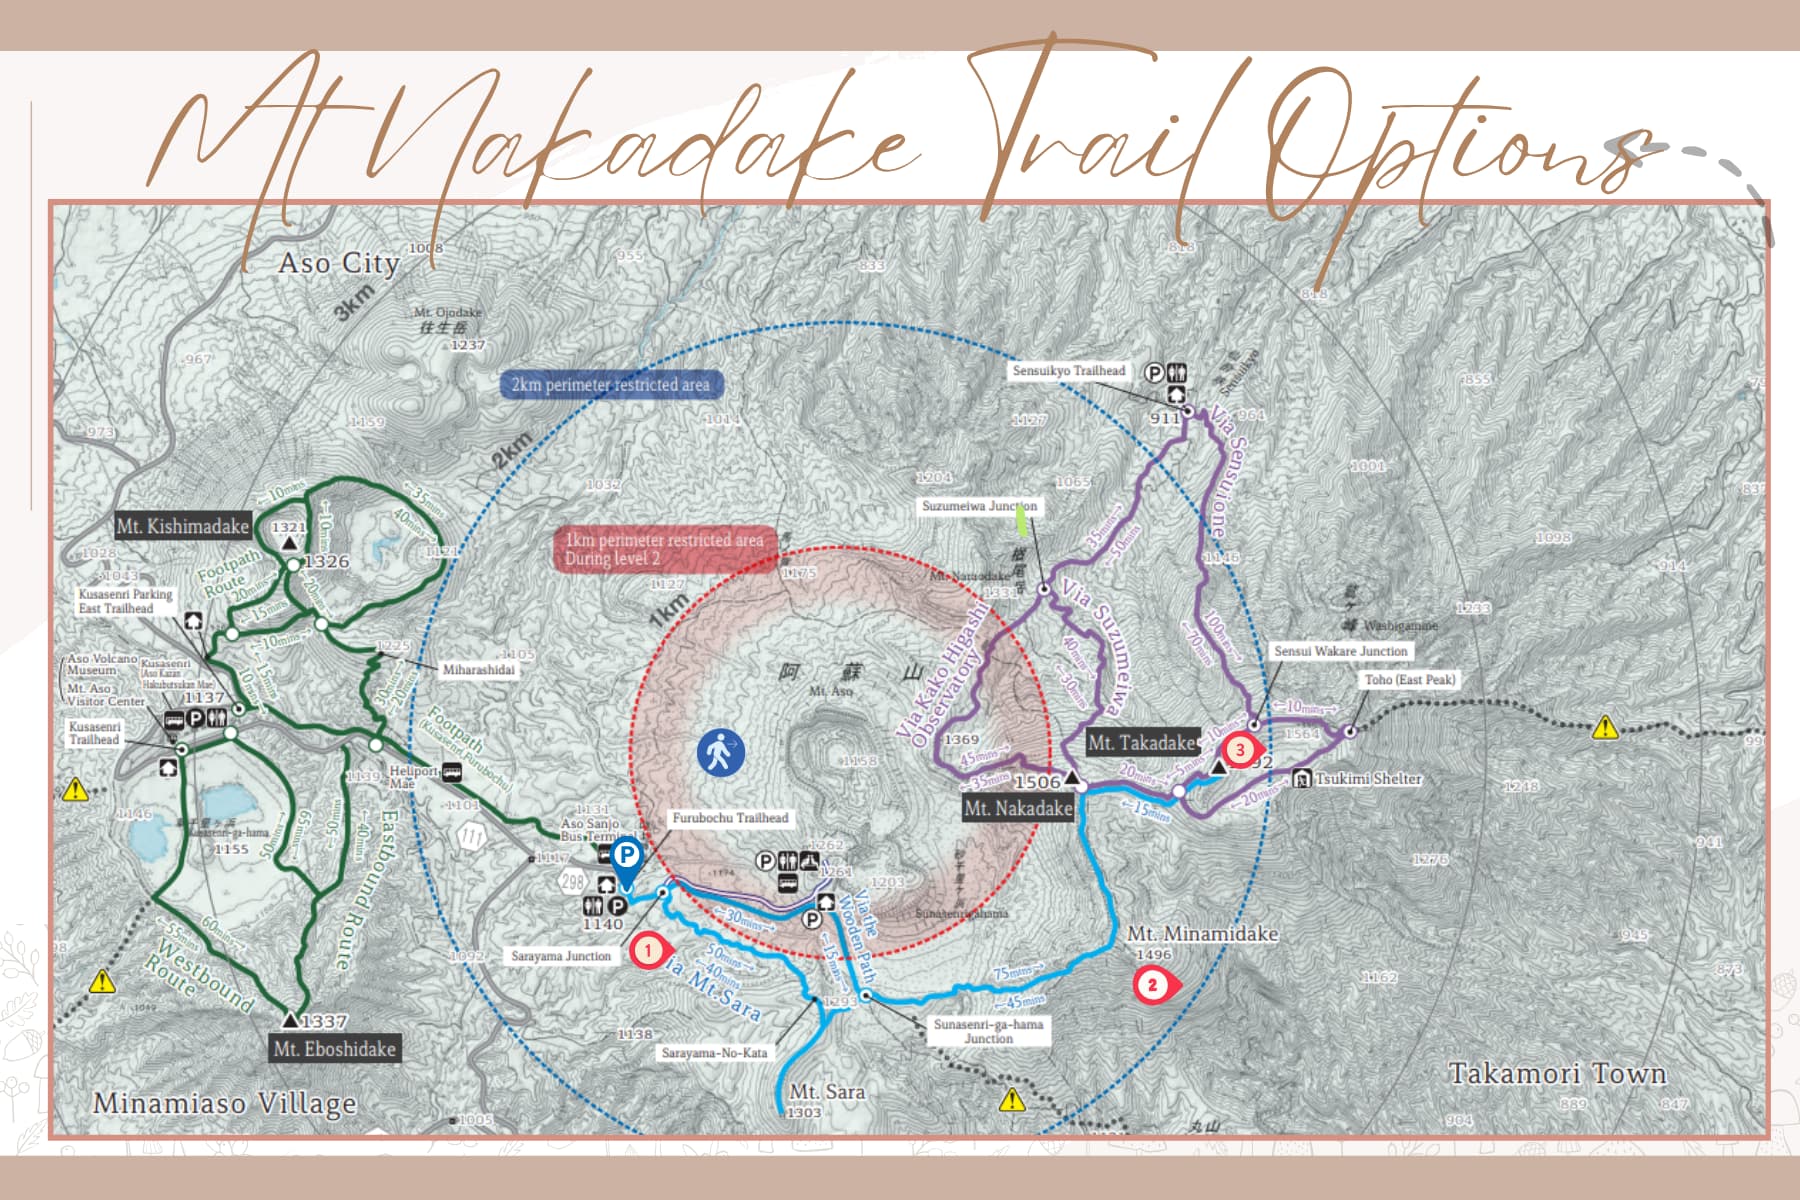
Mt. Nakadake/Takadake (Sunasenri Route) | Hardest | 4-6 Hours | 9.5 Km | Volcano landscapes, steep volcanic ridge |
Mt. Sensuikyo Gorge | Moderate-Hard | 3.5-4 Hours | 6.0 Km | Adventure hikers, alternative path to see Aso Crater, amazing crater views |
Mount Eboshidake Hike
- Distance: 3.9km Loop
- Elevation Gain: 230m
- Highlights: Seeing the stunning pink azeleas, ever changing landscape views, and view of Aso crater from the summit.
- Duration: 2.5 Hours
- Cost: Free for the trail, 500 yen for parking
- Trailhead here

Overview of Mt Eboshidake Hike
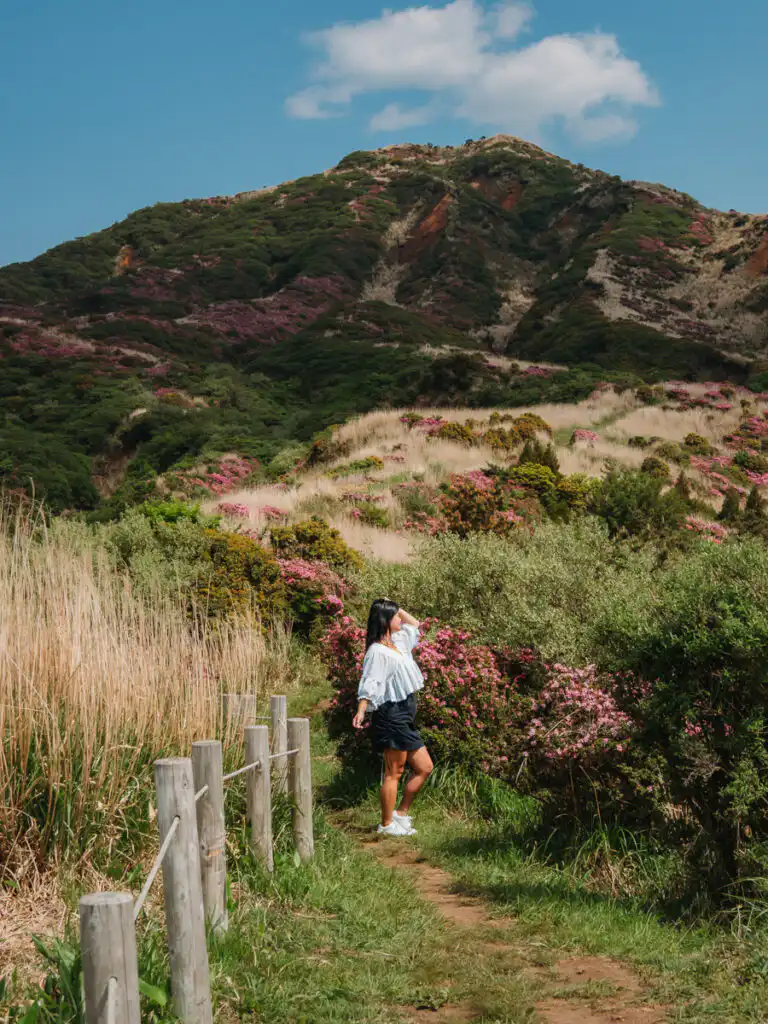
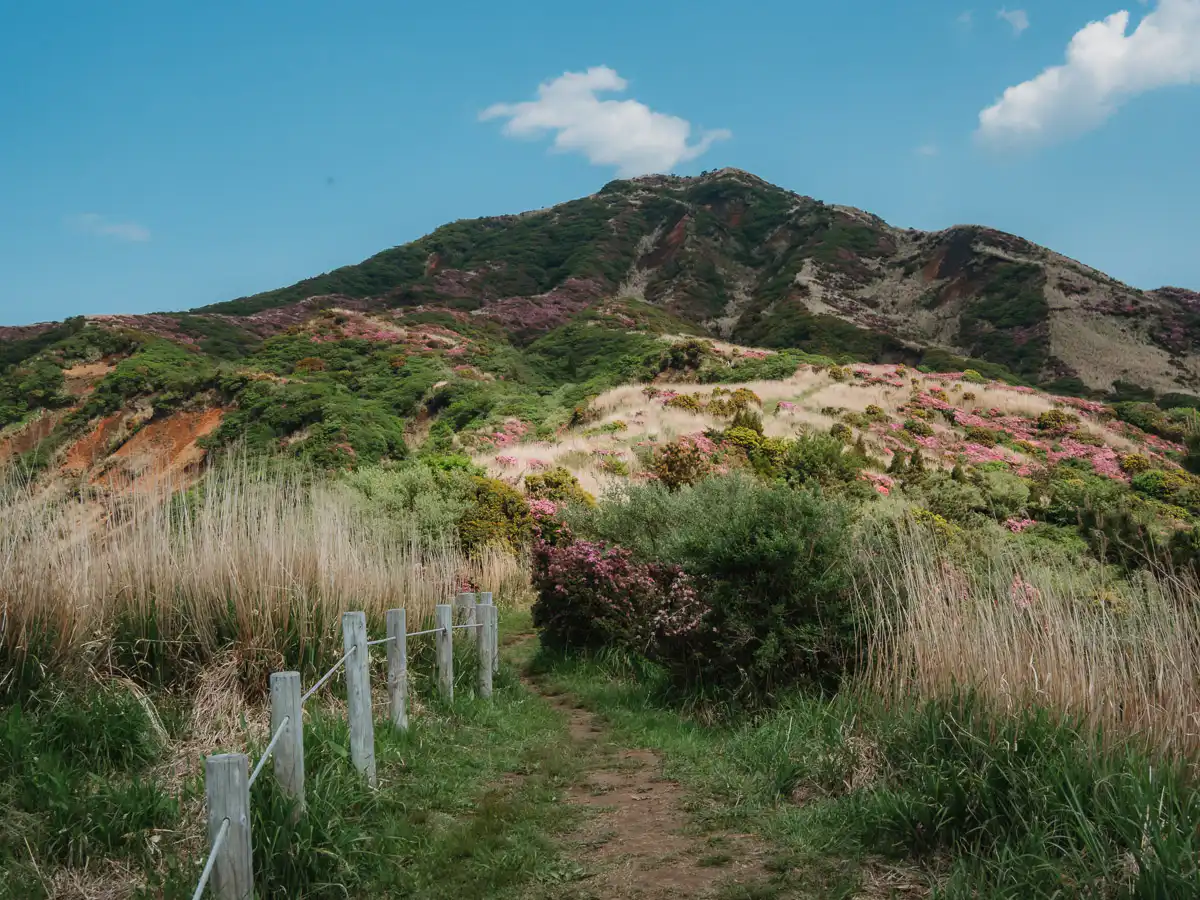
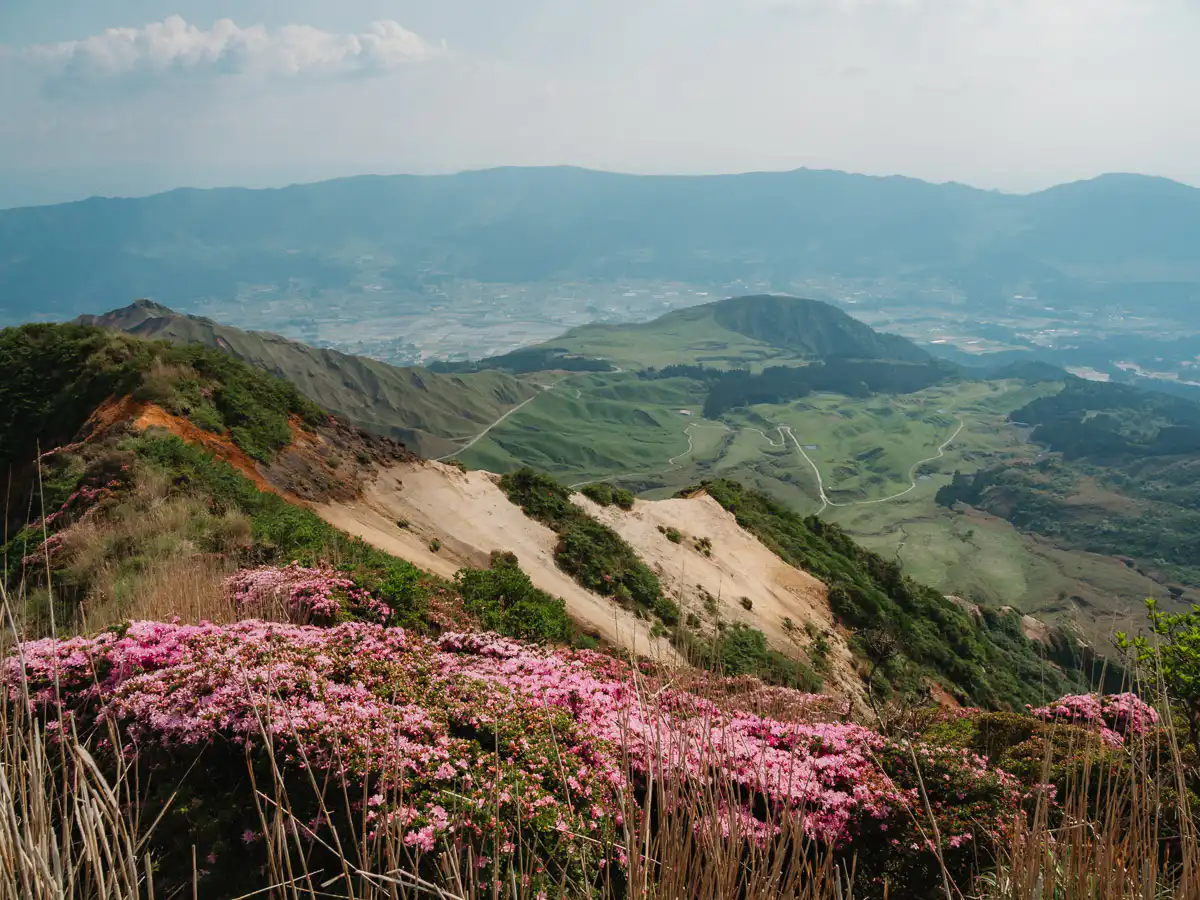
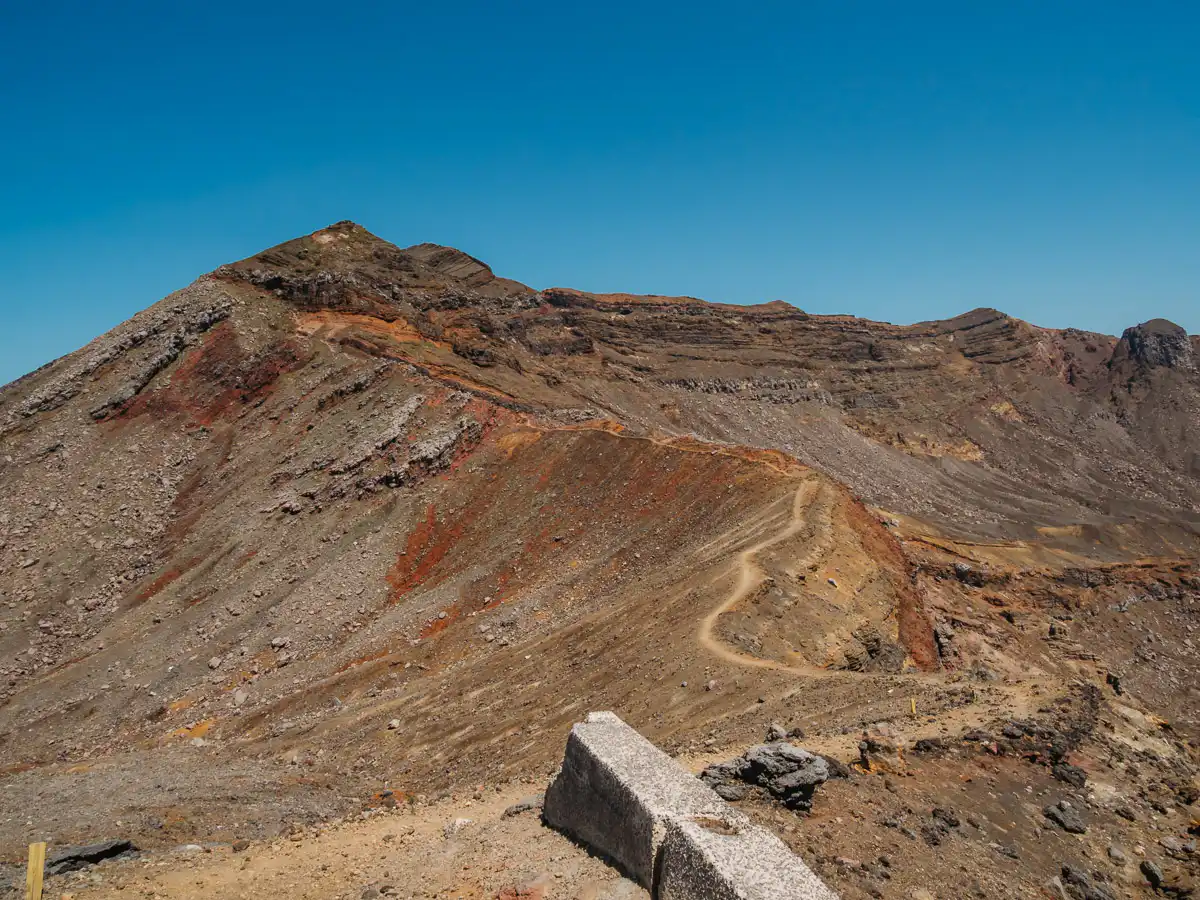
Mount Eboshidake turned out to be one of our favourite hikes in the entire Aso region. Not only is the hike accessible and not too challenging, but we were blown away by the ever changing and beautiful landscape at every turn. What’s more is that we got to visit during spring time when the local pink Azeleas were blooming, making the landscape that much more mesmerizing.
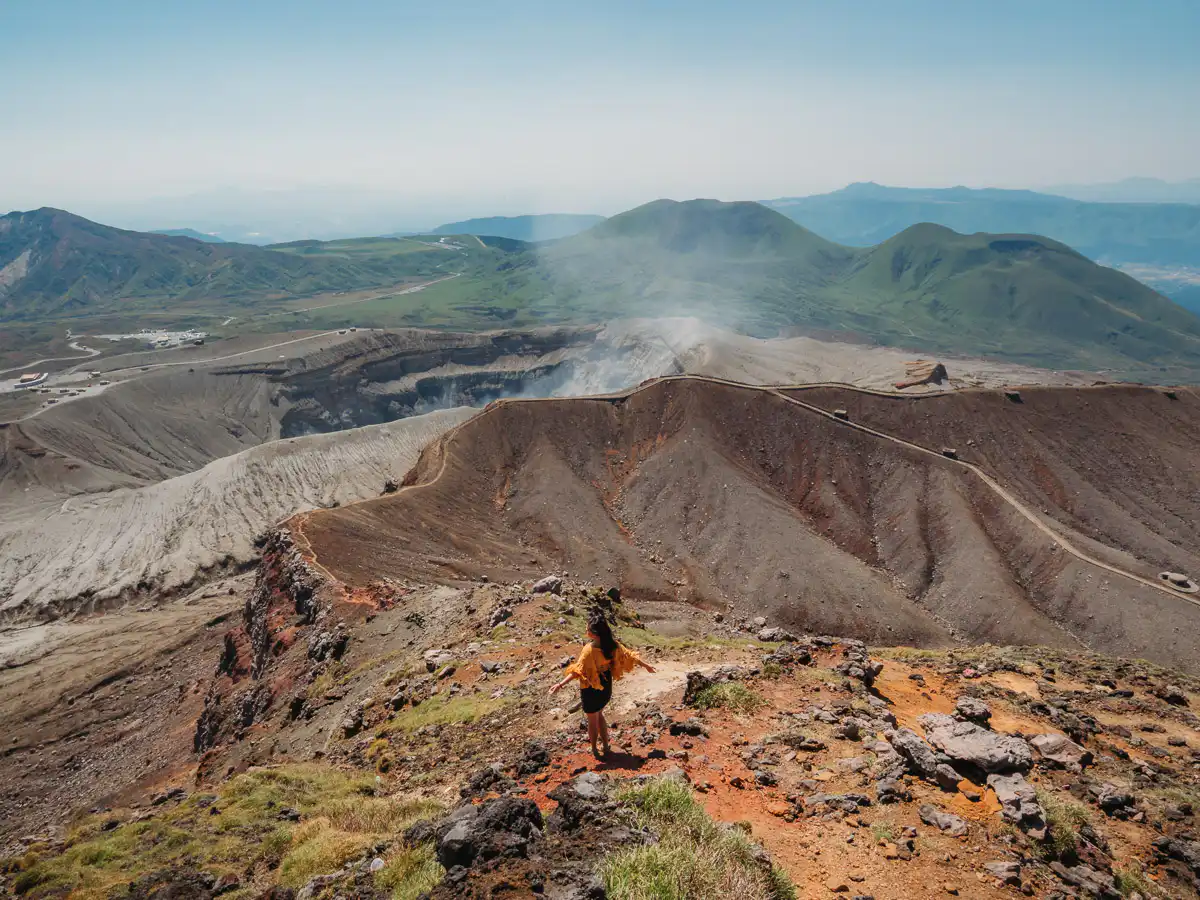
The hike is only about 2.5 hours long along packed down dirt and rock trails, and we were able to complete the hike even in our sneakers (since we forgot to bring our hiking boots). Once you reach the summit, you’ll also get an impressive view of the smoking Aso crater.
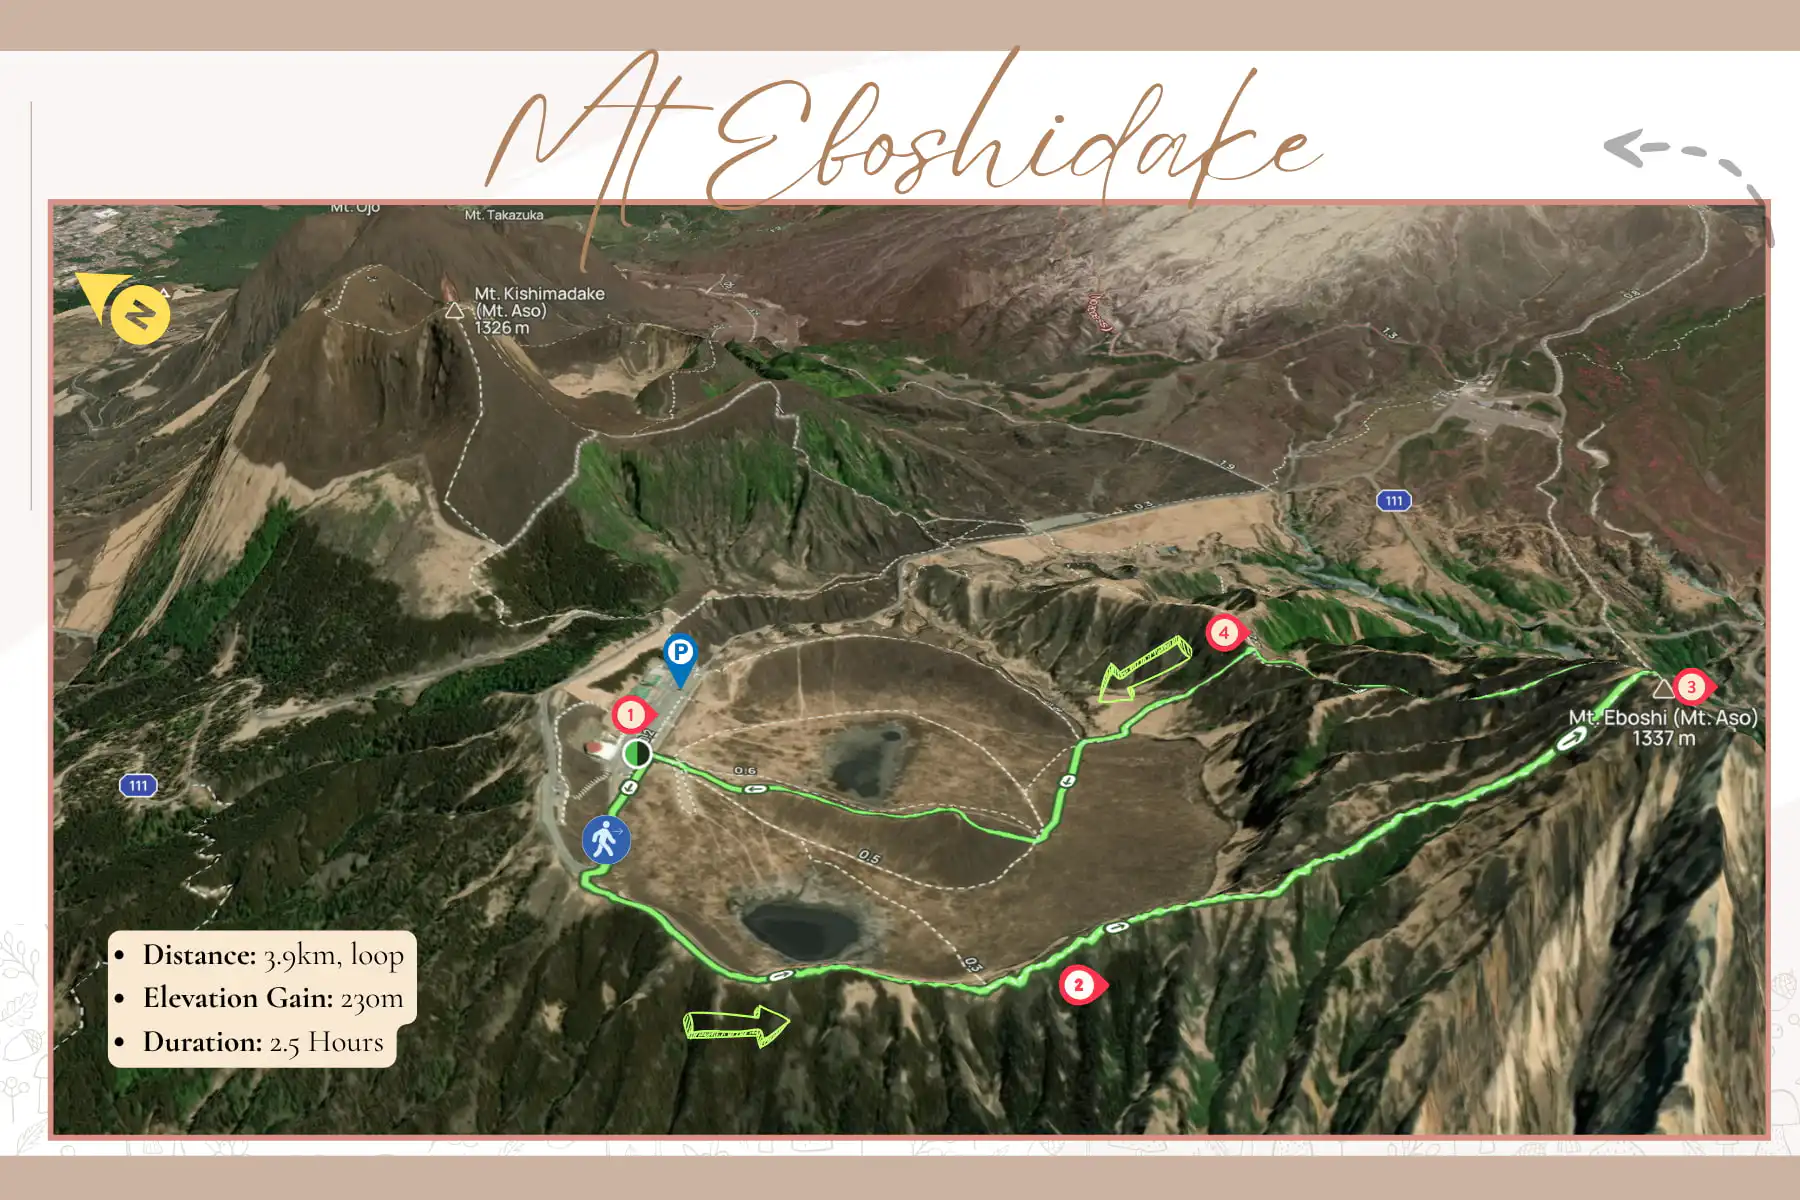
Trailhead and Parking
Drive to the Aso Volcano Museum where you’ll find the main parking lot (Kusasenri Parking lot). There is a charge of 500 JPY per day for the parking, and the trailhead starts directly south of there. If you arrive earlier, you can also park at Kusasenrigahama parking lot for free, but they only have about 15 spots.
To find the trailhead, just head south out of the parking lot towards the big flat green pasture where you’ll find people doing horseback riding. Follow the pathway along the central pasture towards the right side where you’ll find a small staircase to access the mountain. This brings you onto the pathway up the Western ridge of Mount Eboshidake.
From here, the trail climbs steadily along the ridgeline of Mount Eboshidake toward the summit. The entire ascent is packed with breathtaking views of the surrounding landscape, and if you visit in spring like we did, the entire mountainside is blanketed with beautiful pink azeleas.
After reaching the summit, you can enjoy a small picnic/lunch before heading down along the eastern ridge, directly overlooking the Aso Crater.
Trail Difficulty and Conditions
The trail is mostly packed down dirt and rocks, making it quite easy to navigate the trail even when not wearing dedicated hiking boots. We recommend following the trail in a counter-clockwise direction (like described above).
Mount Kishimadake Hike
- Distance: 3.5km, out-and-back
- Elevation Gain: 200m
- Highlights: This was our favourite sunset spot, so much that we went there twice! We also loved the sheer diversity of views within this short 3.5km hike.
- Duration: 2.5 Hours
- Cost: Free for the trail, 500 yen for parking
- Trailhead Here
Overview of Mt Kishimadake Hike
This was without a doubt one of our favourite hikes in Mount Aso, so much so that we did it twice!
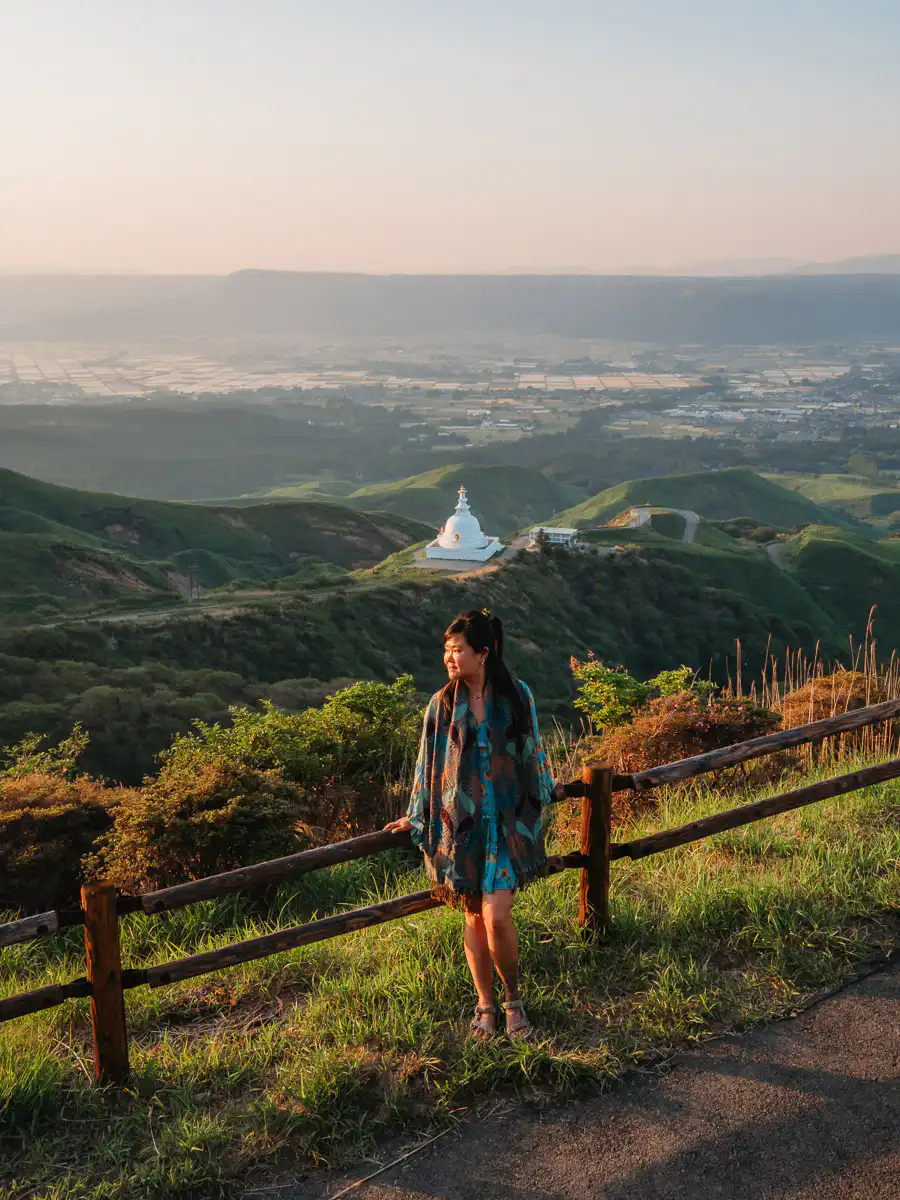
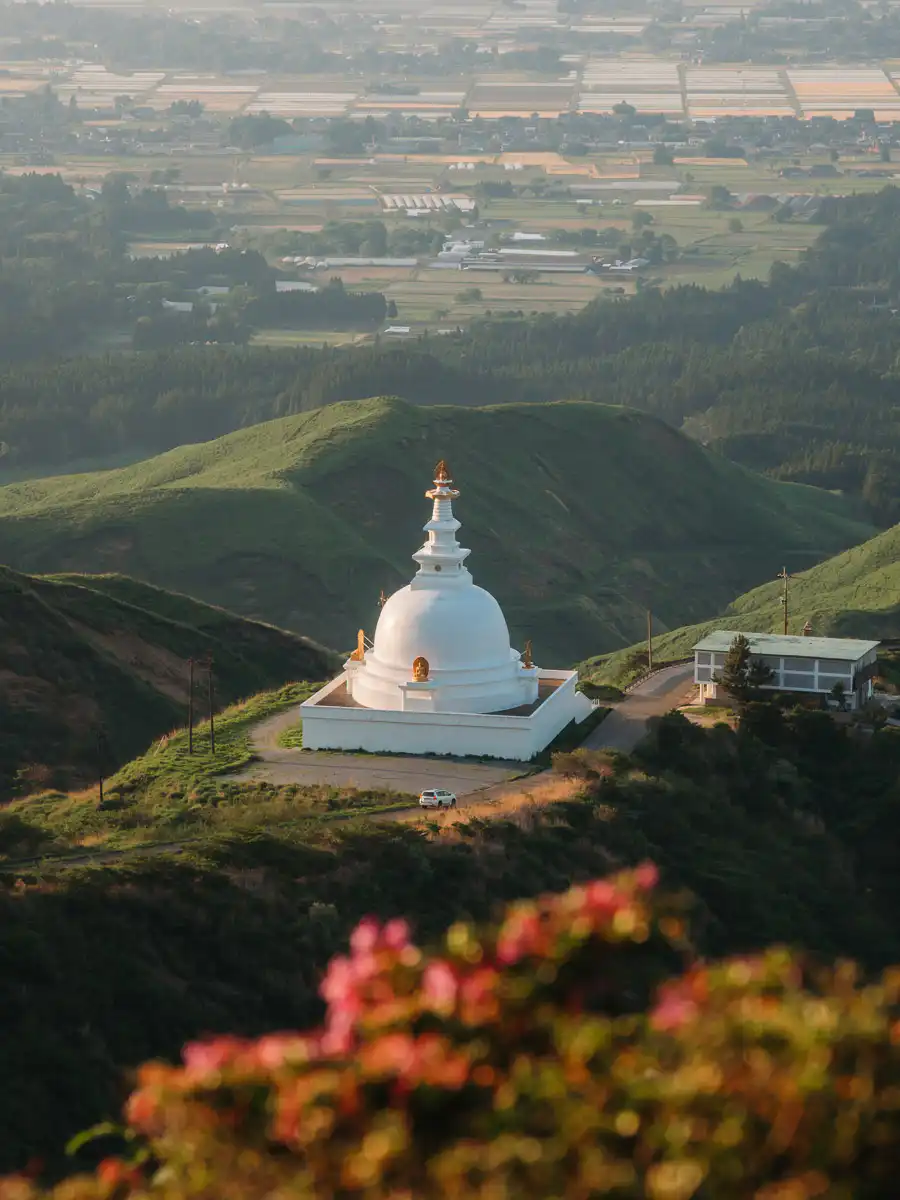
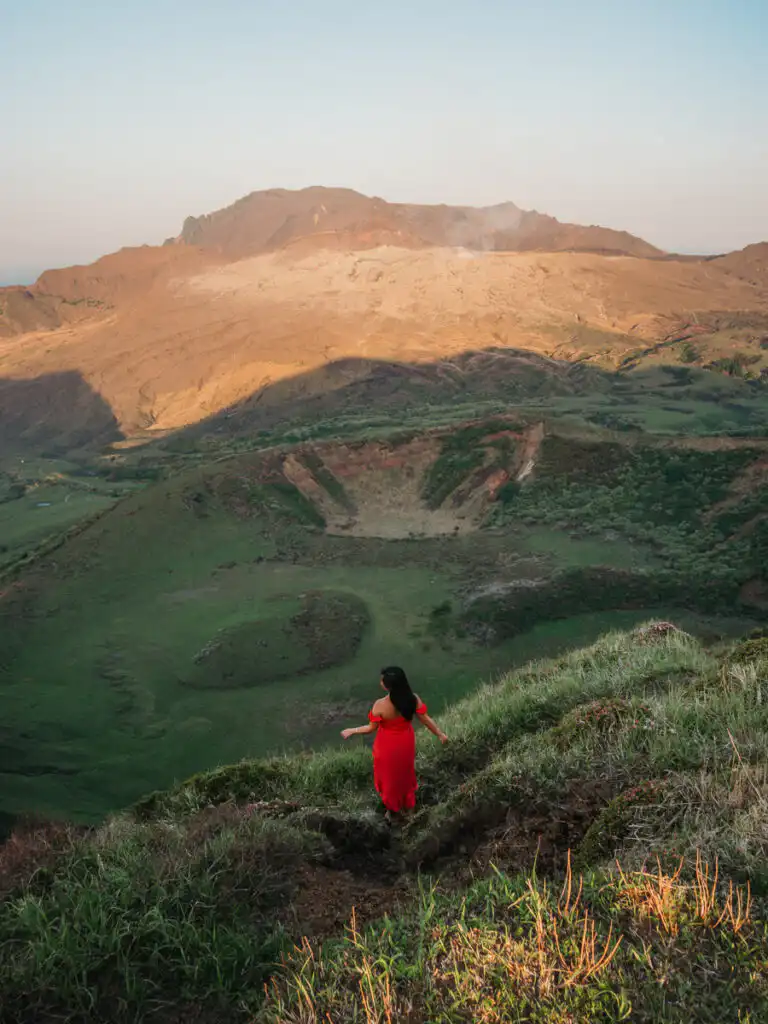
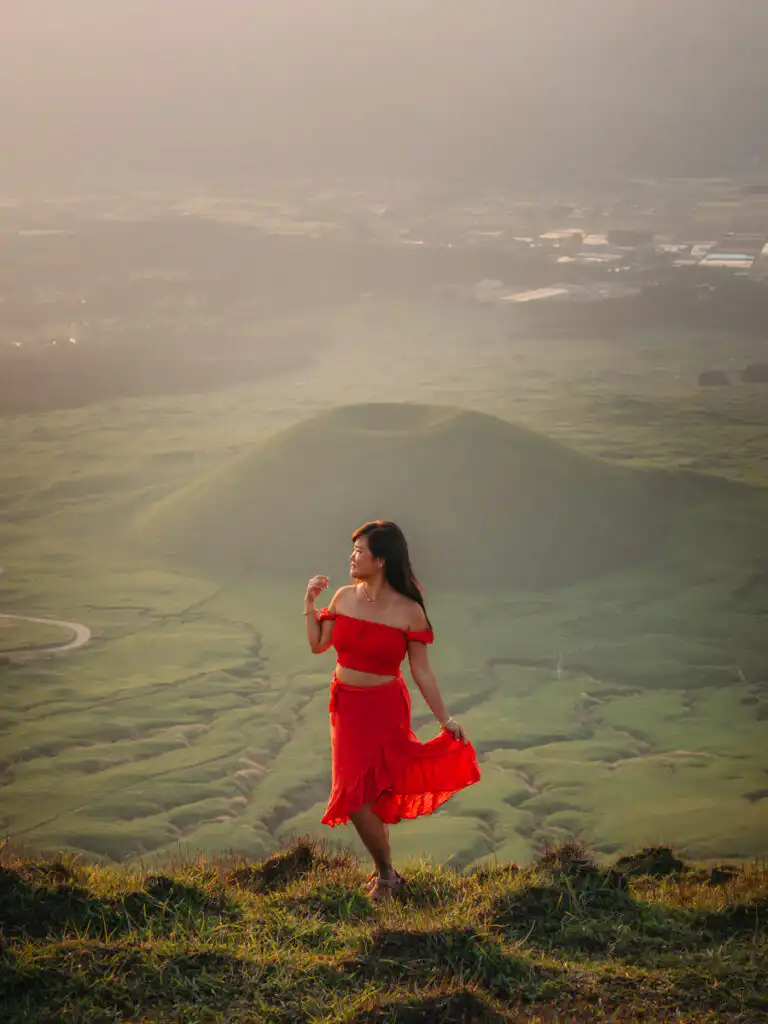
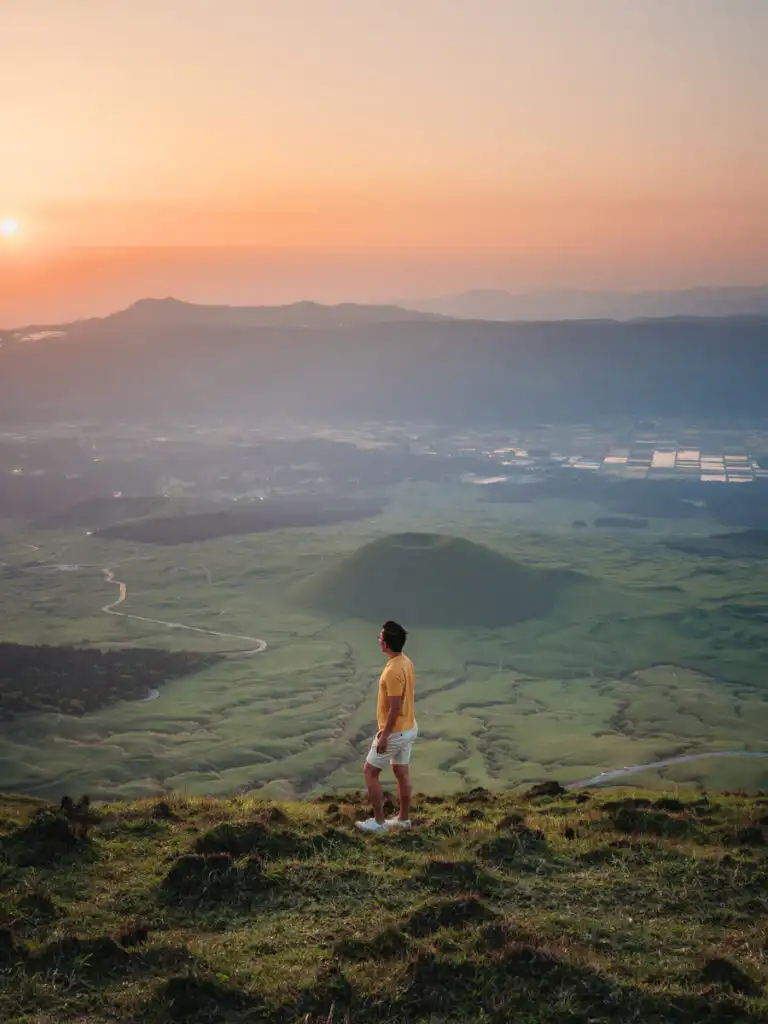
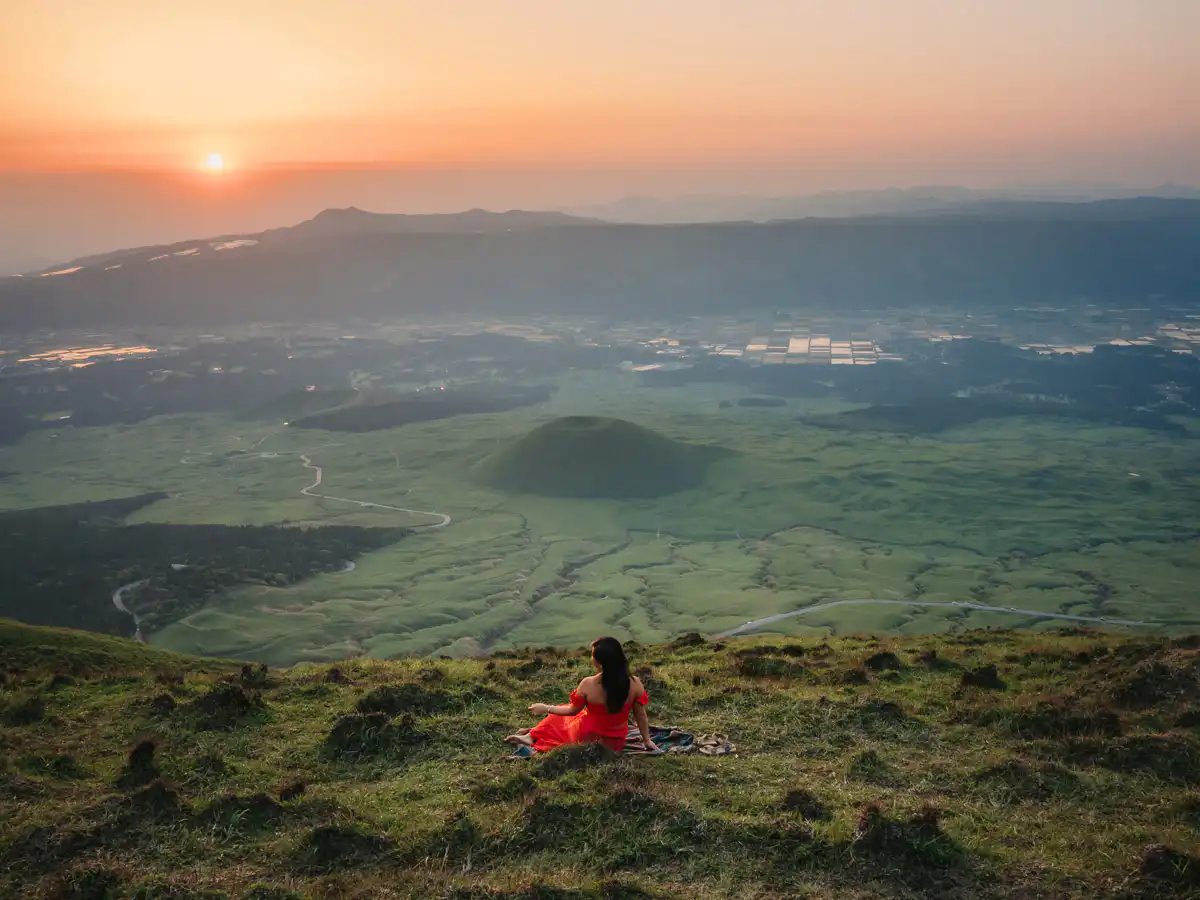
This hike is incredibly accessible, climbing up countless stairs to reach the top of Kishimadake where you get one of the most impressive 360 degree views of the area. Mount kishimadake is actually an inactive volcano and you can walk along the entire circular ridge and look down into the green crater. At the same time, this will give you some of the best views of the surrounding landscape, where the south showcases Mount Eboshidake and Aso crater, and the north Aso city and our favourite Komezuka Green volcano.
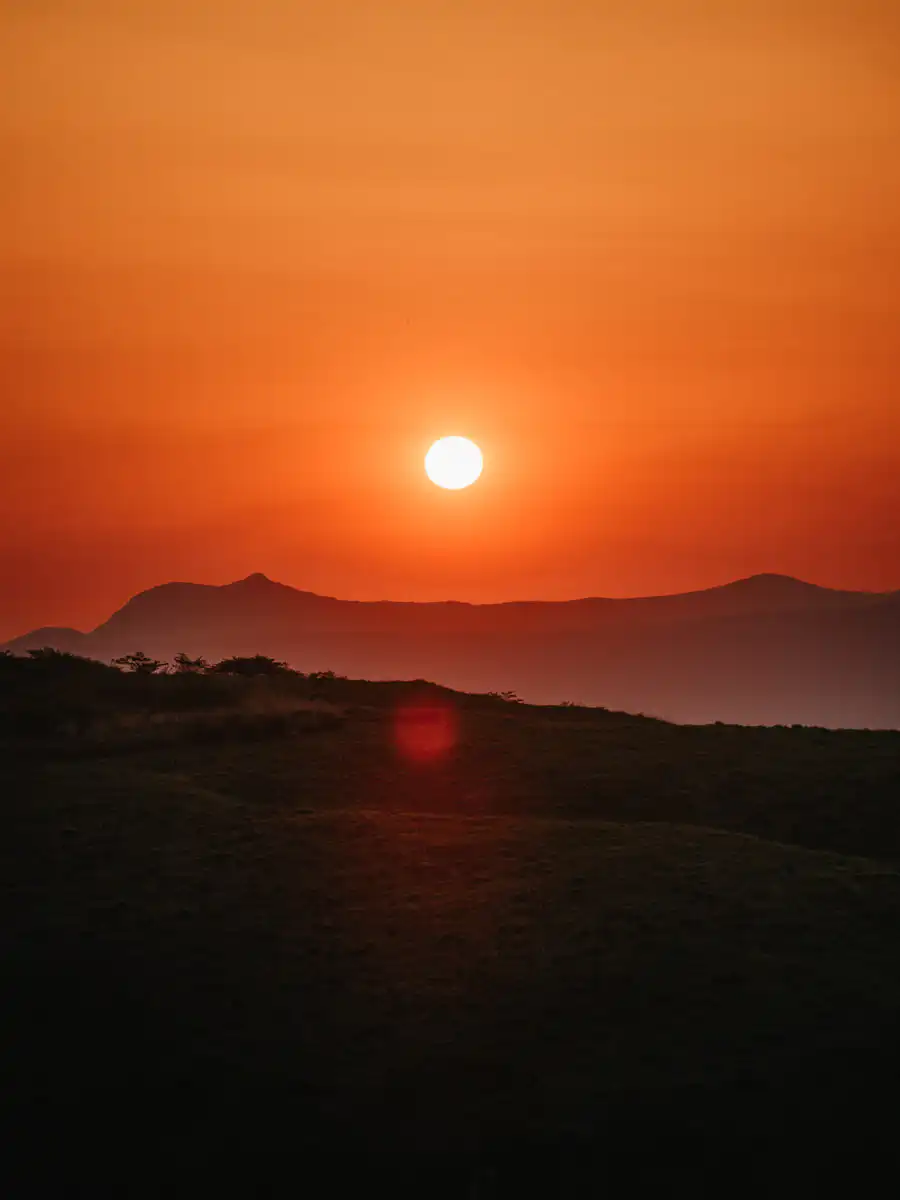
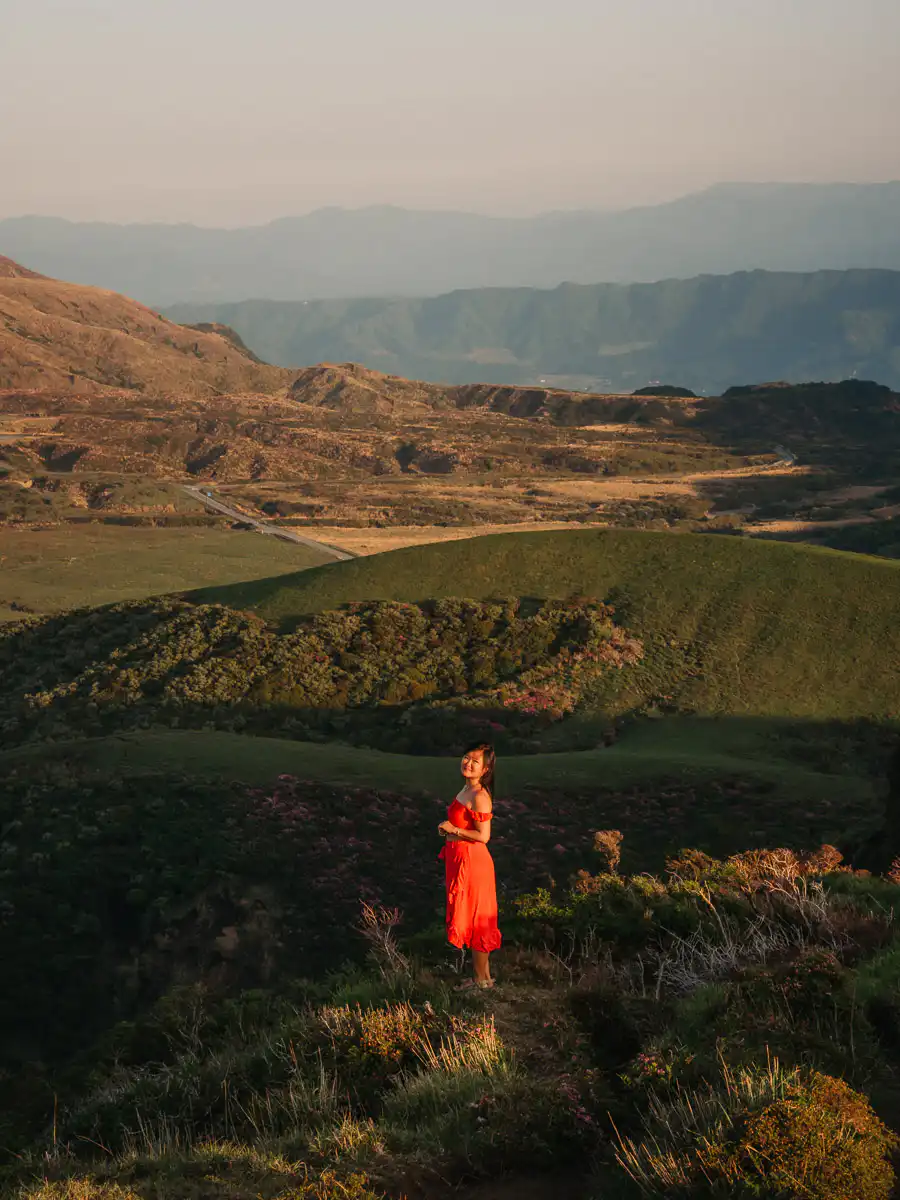
This is also one of the best spots for sunsets as it looks towards the east and aligns perfectly with the Komezuka volcano. Another thing we loved about it was how accessible it is. The trail starts from the same parking lot as Mount Eboshidake, and then you head up along a paved pathway and then a long set of stairs. This made it comfortable and safe for us to watch sunset and descend even after dark.
The total trail distance is around 3.5km, but if you have time, it can be extended to around 5km where you descend along a separate ridge instead of the stairs.
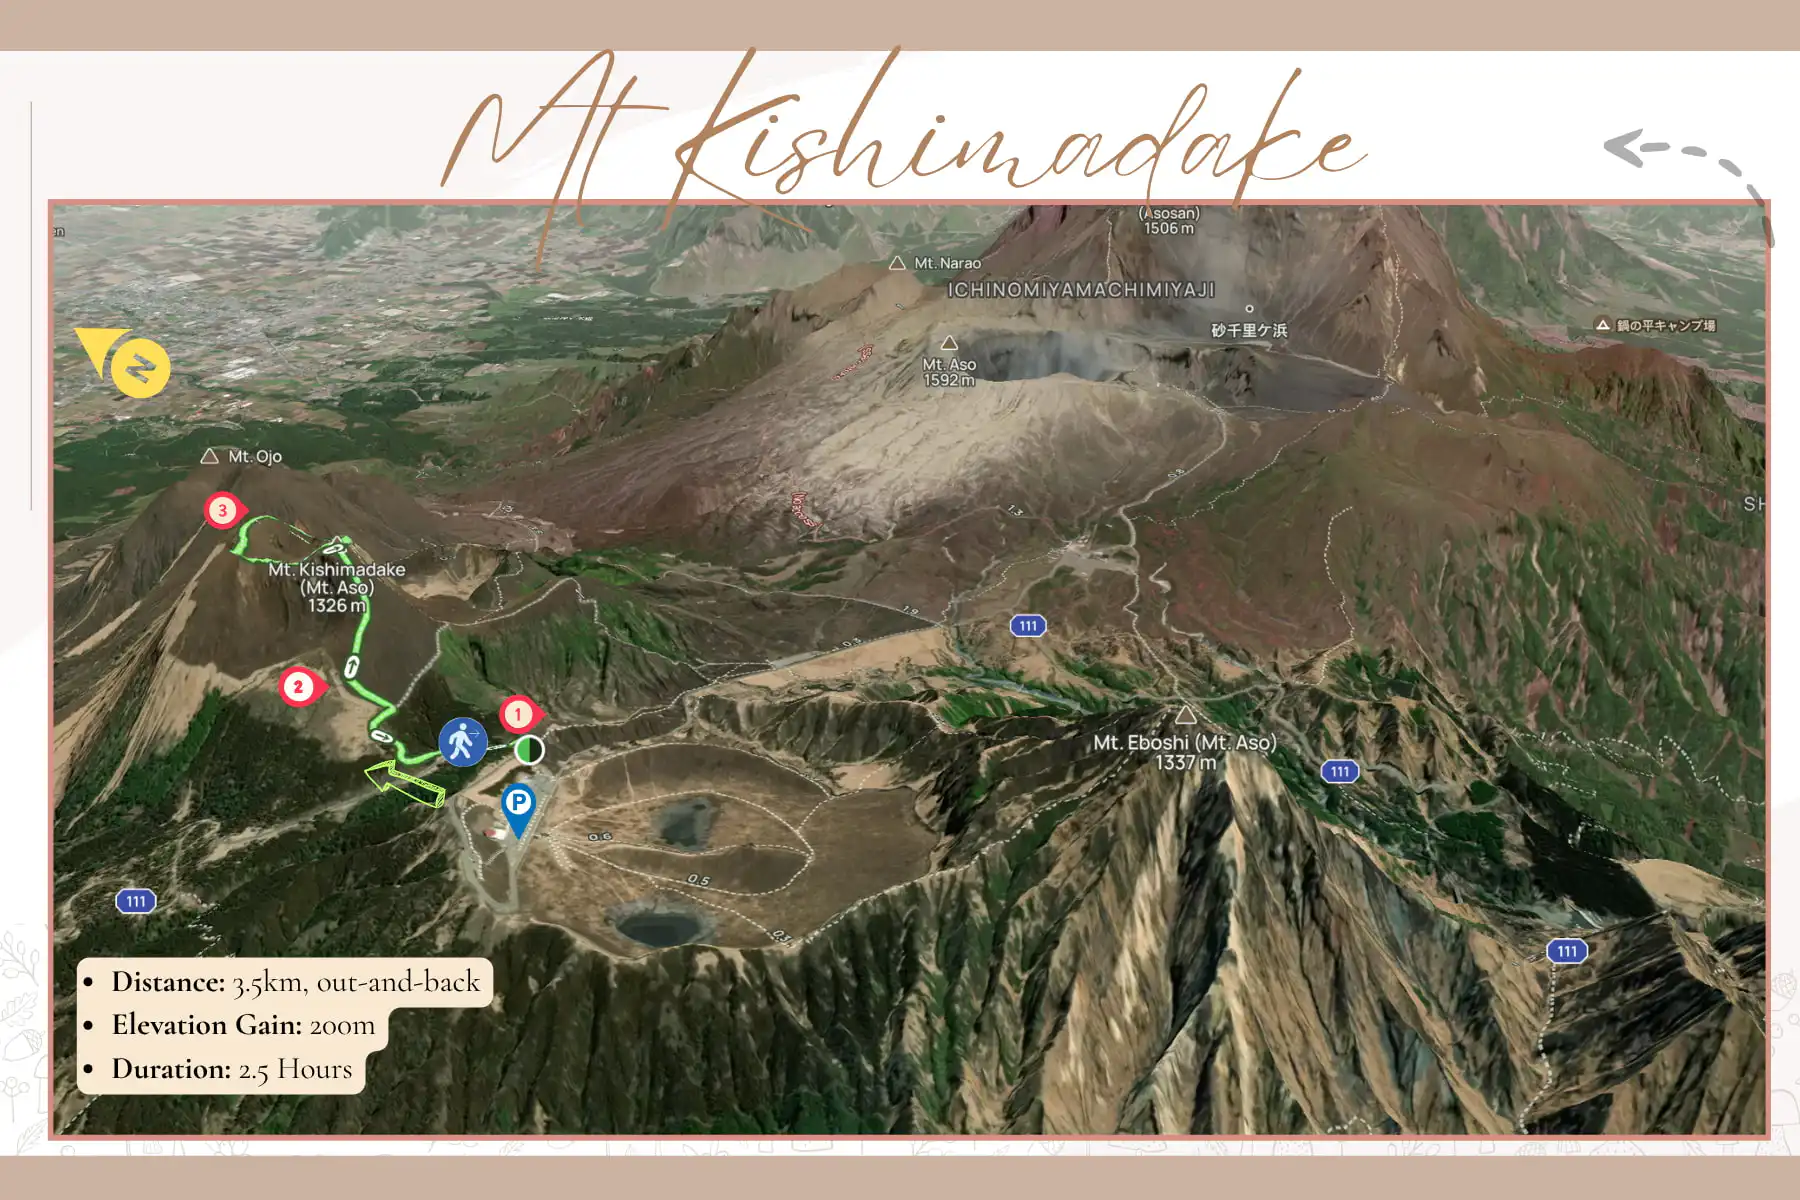
Trailhead and Parking
The trailhead starts here. We recommend you park in the free parking lot or the main paid parking lot, and then head to the eastern end of the parking lot where you’ll find the small trail up towards the northern direction. once you reach the trailhead, it’ll be a steep paved slope, before getting to the long set of stairs.
Trail Difficulty and Condition
The trail is considered easy. The hike is along a paved pathway, and then a long set of stairs. We saw a lot of people wearing dresses and doing photoshoots there. We even saw a whole wedding photoshoot, so it shows just how accessible it is. Make sure bring a jacket though as it does get quite cold after sunset.
Sensuikyo Gorge Hike up to Mt Nakadake
- Distance: 6km to Mt Nakadake Summit (can go further to Mt Takadake Summit). The trail is more of an out-and-back hike, rather than a loop (make sure to check out why I don’t recommend doing the loop in the ‘trail difficulty’ section above)
- Elevation Gain: 550m
- Duration: 3.5 Hours out and back
- Cost: Free for the trail and parking
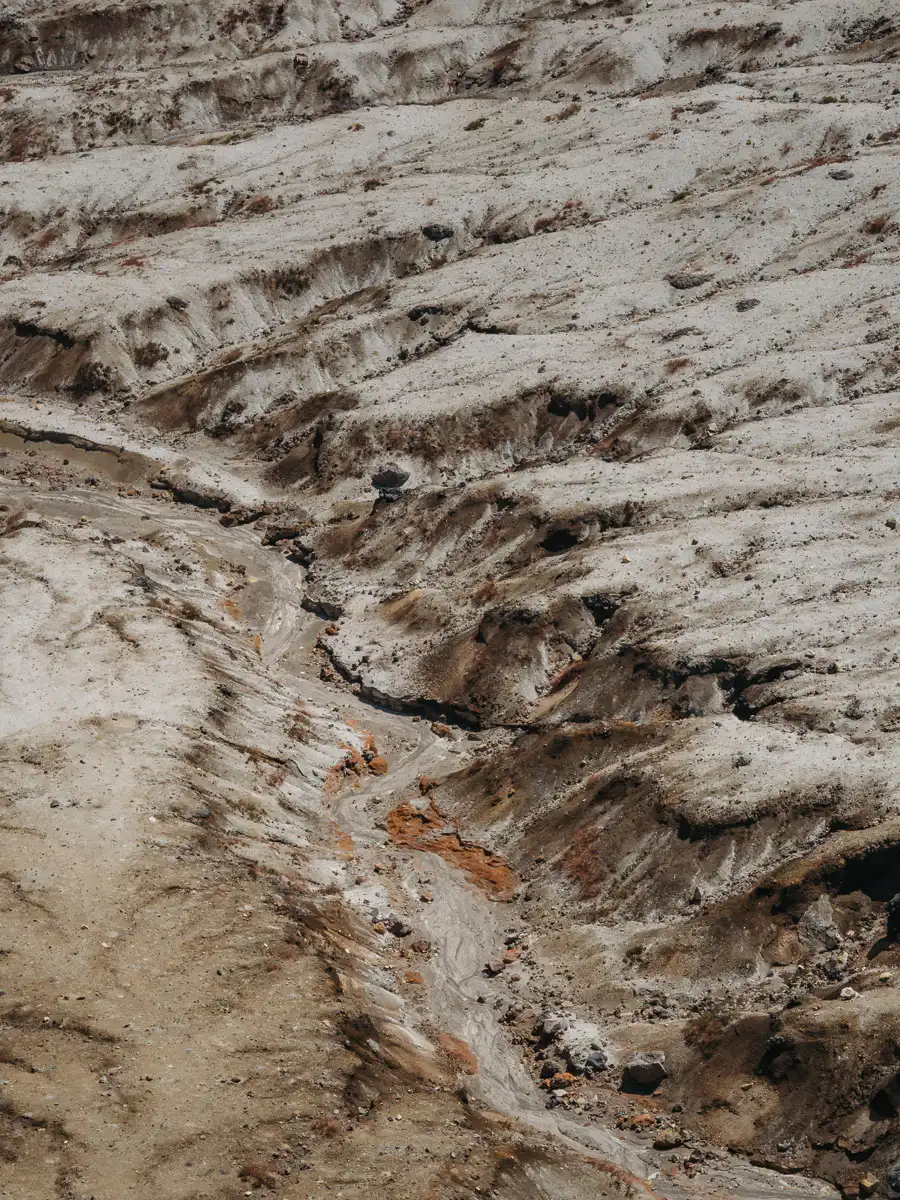
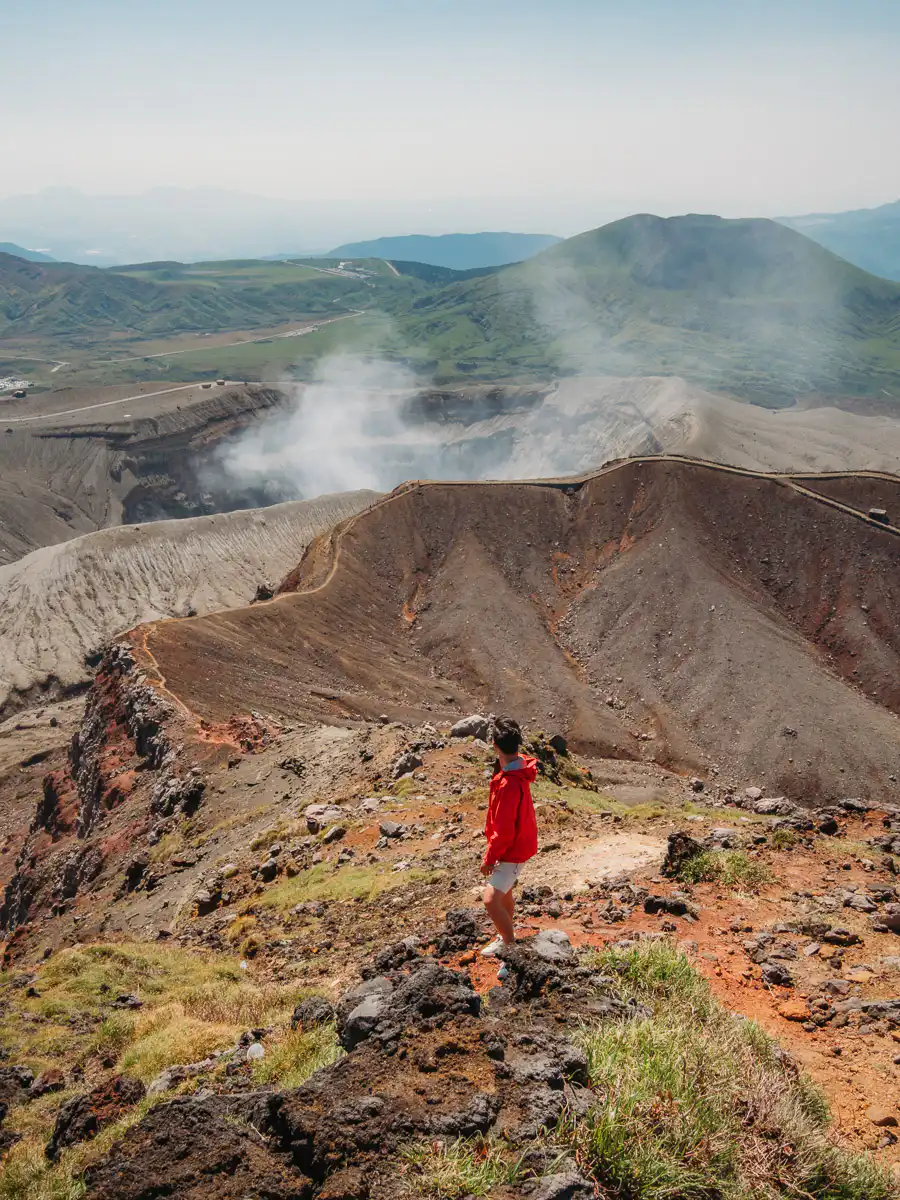
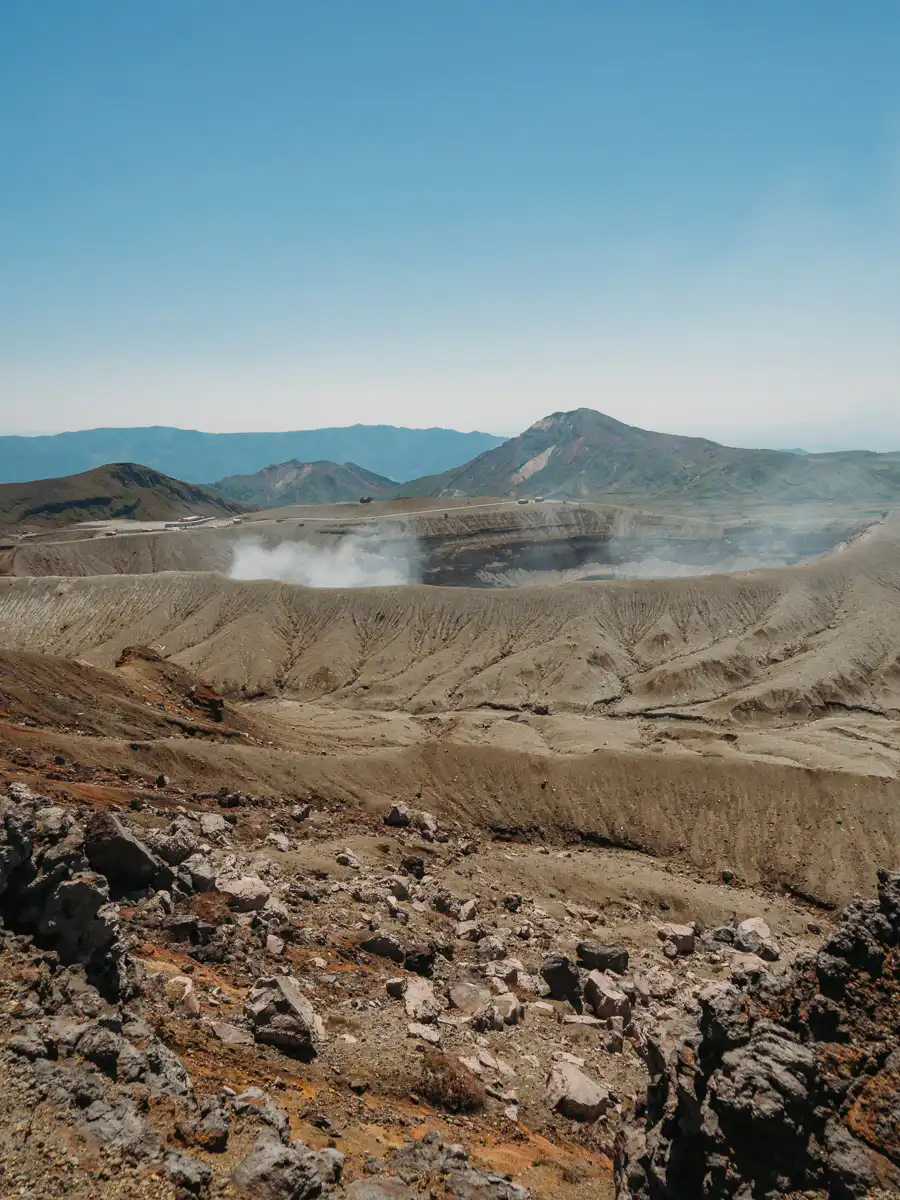
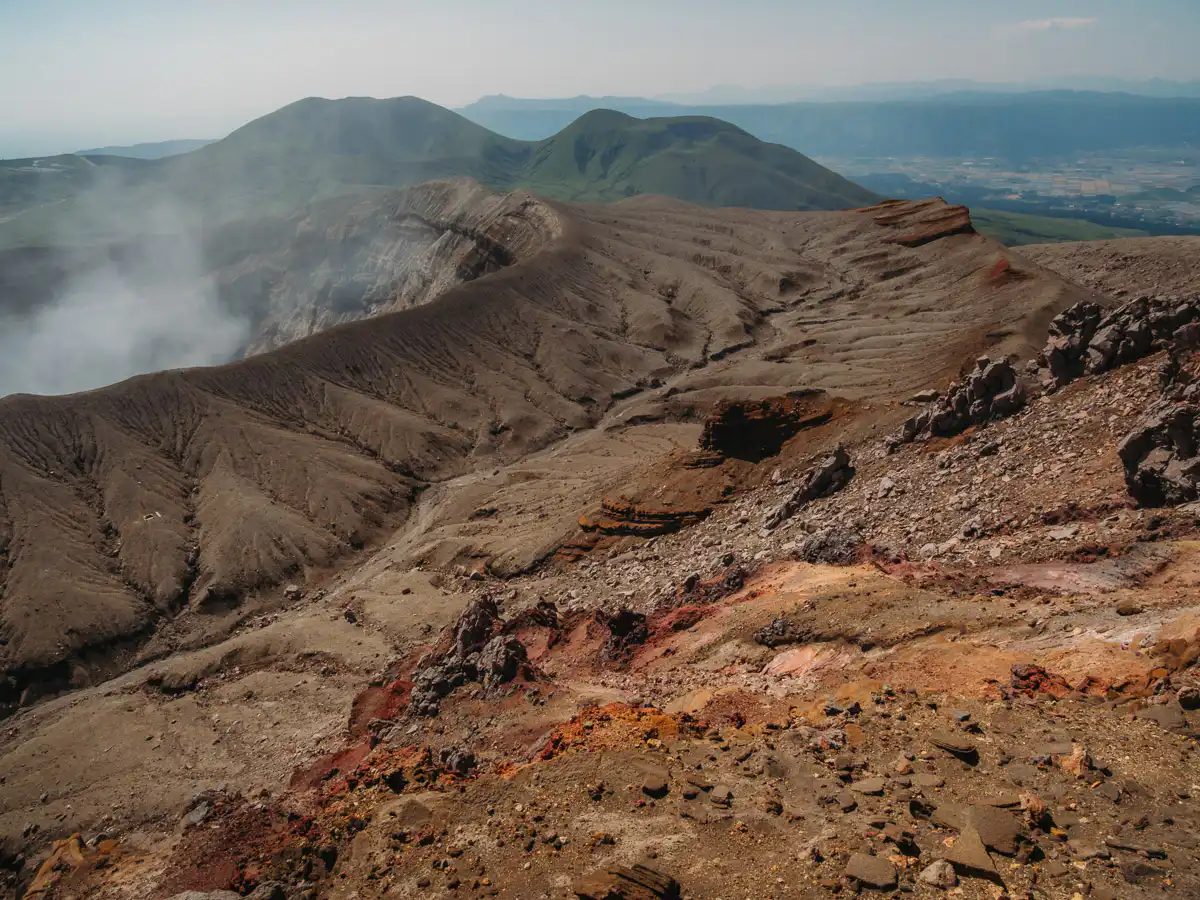
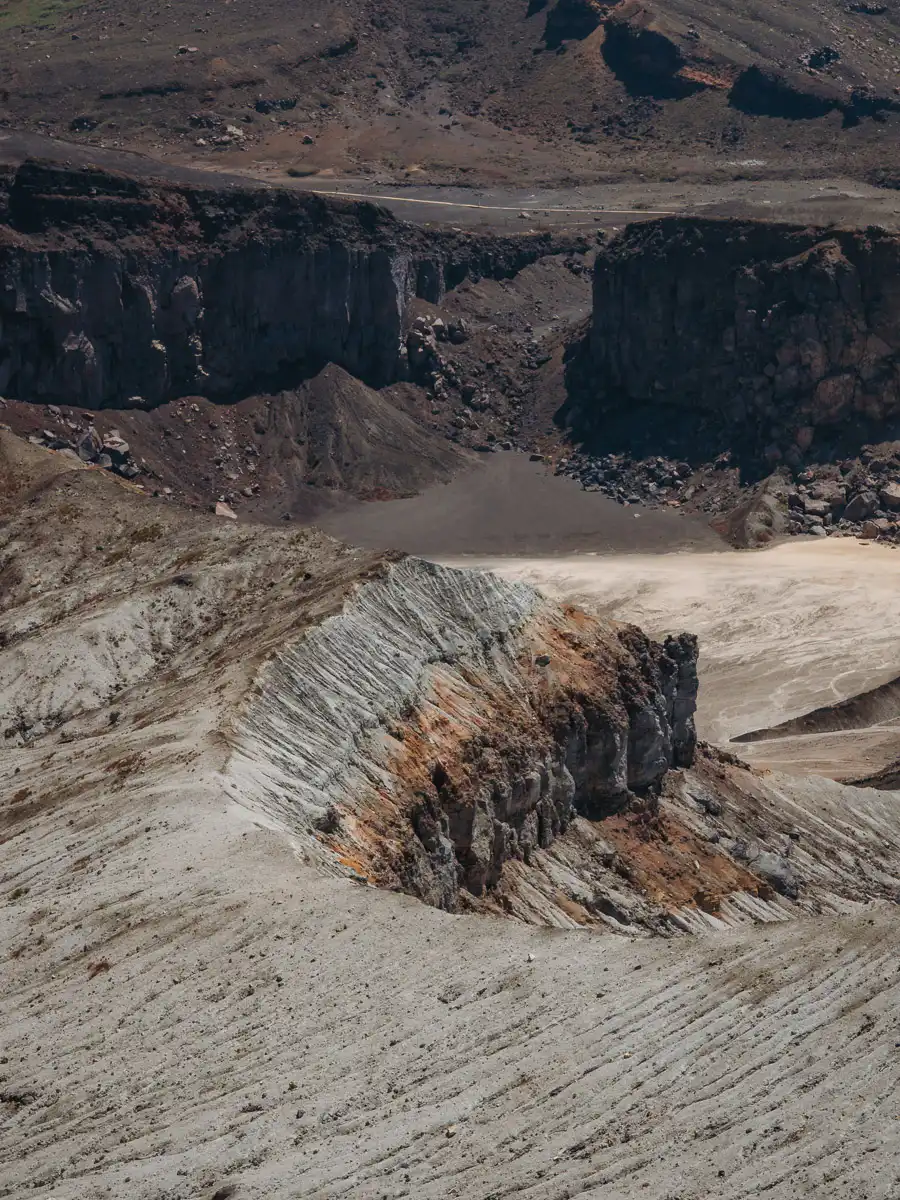
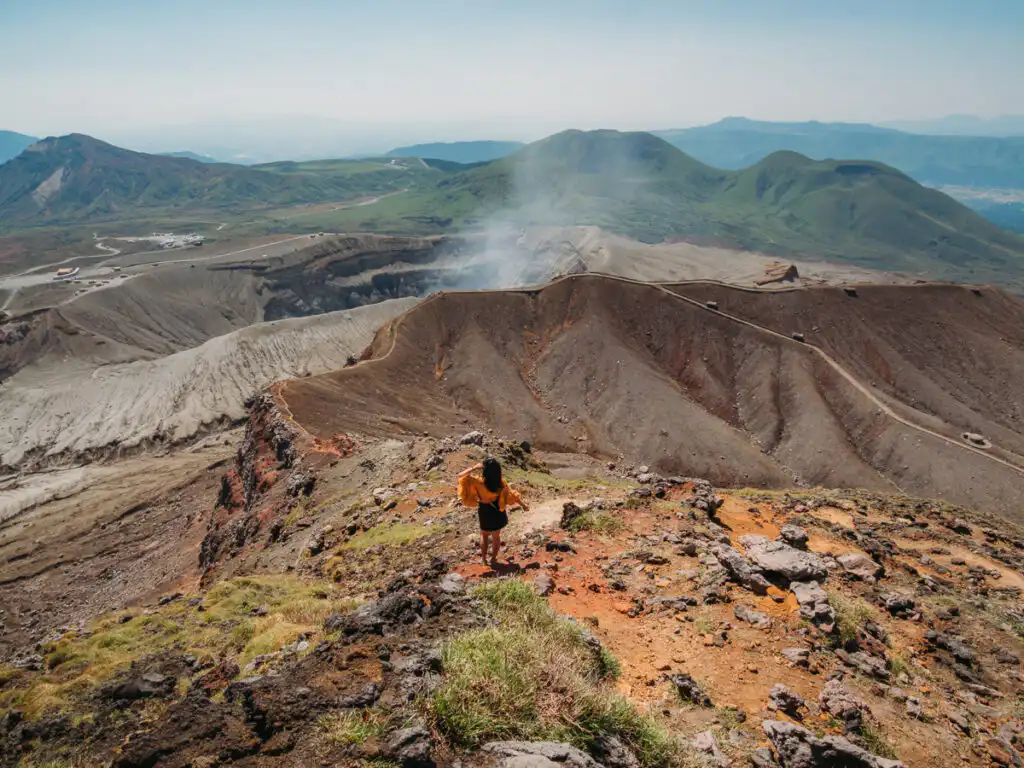
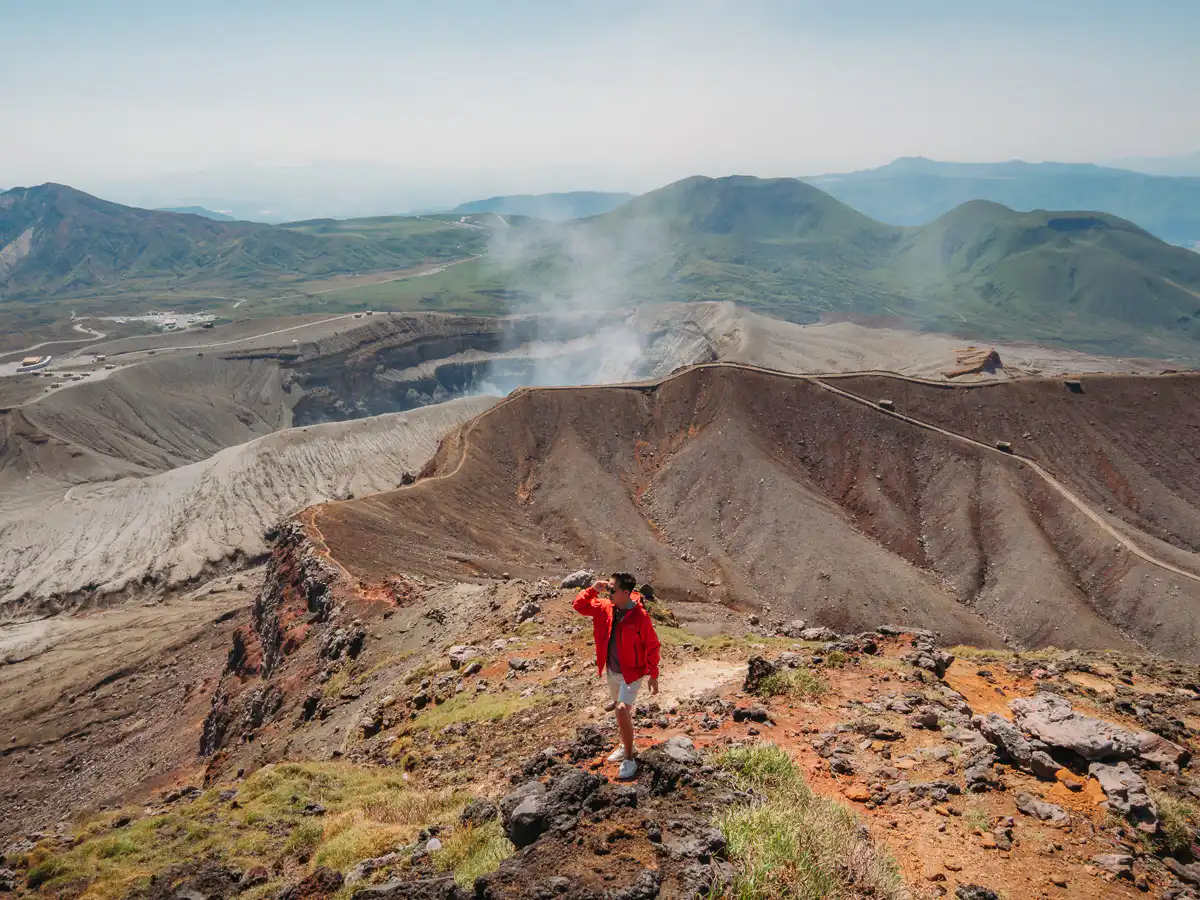
- Highlights: On this hike, you’ll get to see incredible volcanic terrain, the closest view of the smoking Aso crater, and some truly alien-like landscapes.
- Trailhead Here
Overview of Sensuikyo Gorge Hike
At first, we had no idea the Sensuikyo Gorge to Mt Nakadake hike even existed. Our original plan was to tackle the popular Nakadake to Takadake trail from the south side of the crater. However, after chatting with another hiker who had recently completed it, we learned that much of the route was steep, rocky, and covered in loose rocks. Since we hadn’t brought our hiking boots and were concerned about safety, we started looking for an alternative and stumbled upon this trail instead.
Looking back, we’re incredibly glad we did. The Sensuikyo Gorge hike is shorter, more accessible, and far less demanding, yet it still rewards you with the same spectacular views from the summit of Mt Nakadake overlooking Aso’s steaming volcanic crater.
Rather than doing the 6 hour hike of the main Nakadake-takadake trail, this hike only takes about 3.5 hours, and only about 1 hour to reach the first viewpoint of the Aso crater. What we loved was how accessible it was, and it can be done safely since most of the trail is patted down trail and stairs.
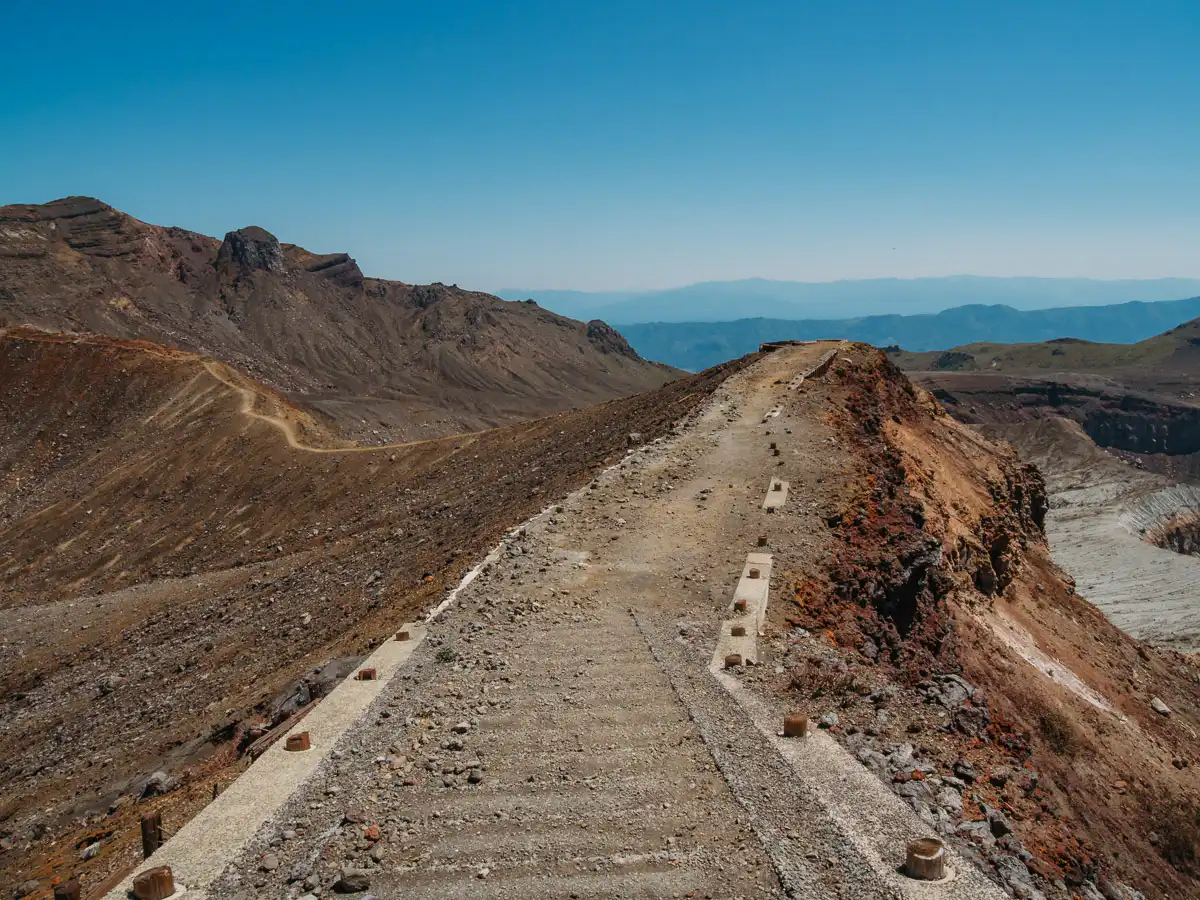
Once you reach the Aso crater viewpoint, you can then decide to head back down or continue up the ridge to reach Mount Nakadake and Takadake summit. This section of the trail becomes a bit more challenging as the terrain changes to loose volcanic rock and scree. We made our way up to the summit of Mt Nakadake, but decided to skip the additional climb to Mt Takadake and turn around from there.
Nonetheless, this hike rewards you with stunning, otherworldly landscapes, incredible views of the Aso crater, and some of the most dramatic volcanic scenery you’ll find anywhere in Japan.
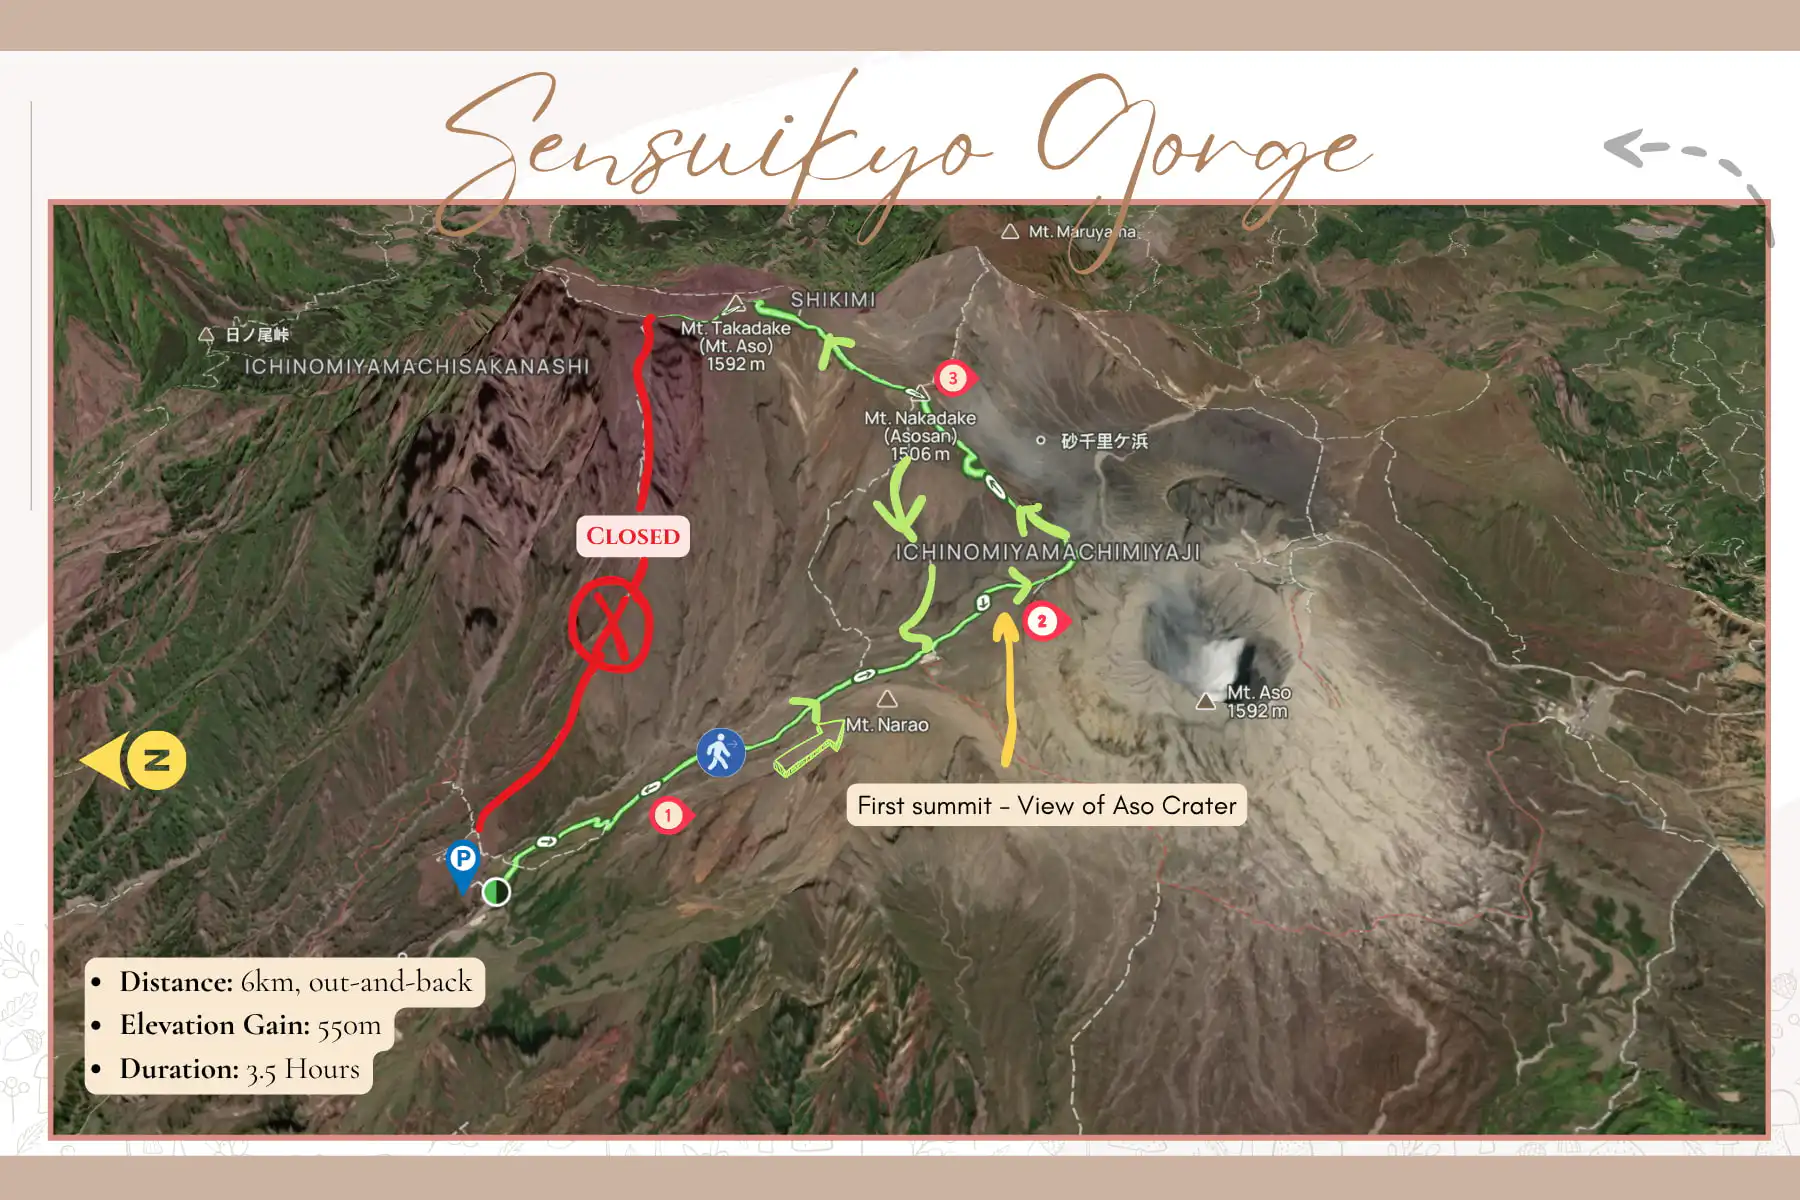
Trailhead and Parking
You can find the trailhead here and there is a free parking lot with space for around 40 cars. From the parking lot, you will have two options of pathways. If you look east, there is pathway leading up a small hill. This is a great sunset viewpoint. If you look South (towards the really high mountain), you’ll see some stairs going up. This is the pathway you need to follow to get up to the Aso crater viewpoint.
Trail Difficulty and Conditions
The trail we followed was of moderate difficulty. The path is mostly packed down trail, with some loose rock, and then staircases. Once you reach the first peak where you can see the Aso crater, the trail then turns to loose volcanic rock. So if you head up to Mt Nakadake or Takadake summit, the trail will be more challenging and it is highly recommended to have hiking shoes/boots. We tackled up to Mt Nakadake in our sneakers but it was challenging due to the poor grip.
One important thing to note is that this hike is sometimes described as a loop trail, with hikers ascending via the western route (the trail we took) and descending via the eastern route. However, we checked out the eastern trail and it looked really treacherous and difficult to follow. In several places, we could barely make out where the path even went.
After doing some additional research, we discovered that much of the eastern trail is reportedly closed or no longer maintained. For that reason, we strongly recommend sticking to the clearly marked western route for both the ascent and descent. Not only is it easier to navigate, but is also significantly safer.
Mt Nakadake-Takadake Hike (Sunasenri Route)
- Distance: 9.5km out-and-back
- Elevation Gain: 495m
- Highlights: Similar to the Sensuikyo Gorge hike, you’ll be rewarded with stunning volcani landscapes, views of Aso crater, and a feeling like you’ve stepped onto Mars!
- Duration: 4-6 Hours
- Cost: Free for the trail, 500 yen for parking
- Possible trail closures depending on volcanic activity and presence of toxic volcanic gases. Make sure to check at the Mt Aso Visitor’s center before attempting the hike.
- Trailhead Here
Overview of Mt Nakadake-Takadake Hike
Mount Nakadake-Takadake Hike is one of the most famous hikes in the Aso Region. Starting from the Asosanjoyuryo Parking Lot, you will first traverse a flat volcanic barren landscape on the southern side of the crater. Normally, you can then take a pathway all the way up to the crater but since a helicopter accident several months ago, access to the trail has been closed.
You will then climb up the steep Mt Minimadake ridge all the way up to Mt Nakadake Summit. From there, you can extend even further up to Mt Takadake summit for one of the highest views of the Aso Region. The total hike lasts close to 6 hours along challenging volcanic terrain, but you’ll be rewarded with one of the most mars-like landscapes.
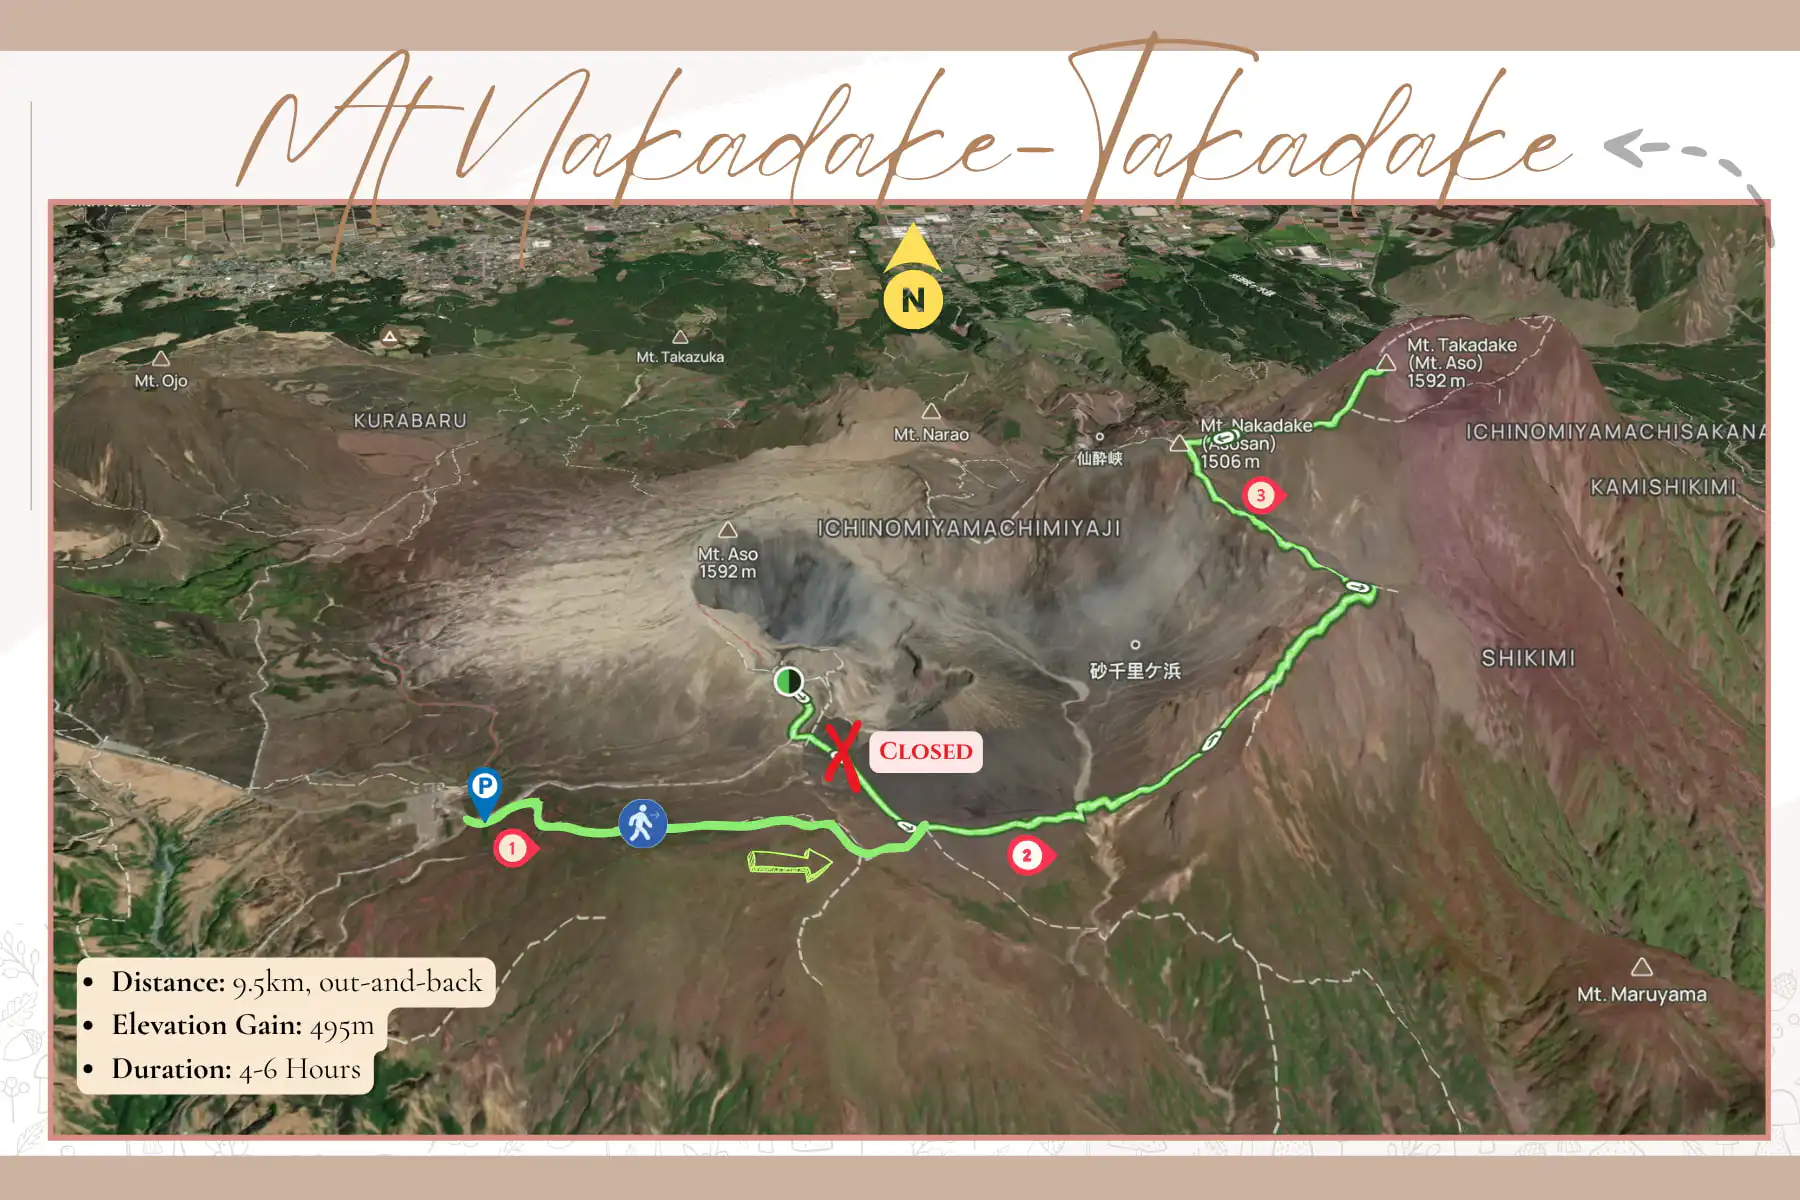
Keep in mind that sections of this trail may occasionally be closed, as parts of the route fall within the volcano’s 1 to 2 km safety zone. When volcanic activity increases or hazardous gases are present, access to certain areas may be restricted for visitor safety. Before setting out, it’s always a good idea to check the latest trail conditions and closure information.
I’ve also included a trail map below showing the different route options available along this hike.
Recommendations for this Hike
This is actually the only hike around Mount Aso that we didn’t get a chance to do ourselves. We hadn’t brought our hiking boots to Japan and, after chatting with a few hikers who had recently completed the trail, decided it probably wasn’t the smartest idea to tackle a steep ridge covered in loose volcanic rock while wearing sneakers.
With that said, we completed the Sensuikyo Gorge hike (mentioned above), which offers many of the same spectacular volcanic views without the extra distance or challenging terrain. In fact, both hikes eventually lead to the same viewpoint overlooking the crater, making the Sensuikyo route a fantastic alternative for less experienced hikers or if like us, you forgot to bring hiking footwear!
Trailhead and Parking
The trail starts from the Asosanjoyuryo Parking Lot. This is a paid parking lot, but once you pay the 500 yen ticket, you have access to this parking lot as well as the main Kusasenri Parking Lot that gives you access to the Mt Eboshidake and Kishimadake hikes.
From the Asosanjoyuryu parking lot, you’ll walk east towards the Susasenri-ga-hama junction, before going up the Mt Minimadake ridge.
Trail Difficulty and Conditions
Challenging. You will be hiking through loose volcanic rock, steep ridges which may be slippery, and some exposed sections. If you don’t have your hiking boots/shoes, we don’t recommend attempting it.
🇯🇵👨🏫 Want to uncover more hidden gem ideas for your Japan trip? Check out our guide on 32 unique things to do in Japan and our comprehensive 10+ day Japan Itinerary guide! And before you go, save yourself the stress and learn from our mistakes — read our 36 Essential tips for traveling in Japan: First time visitors guide.
How Many Days in Mount Aso
We highly recommend spending at least 3 full days in Mount Aso. Most of the other travellers we met there only planned to stay 1 or 2 nights, but with the travel time included, that really only gave them one full day to experience the region. One of them even made the trip from Fukuoka, but only had time to do a single hike.
We ended up spending 5 full days in Aso and honestly felt like it was the perfect amount of time. We spent 3 days hiking, one day seeing the Taiko show, and another day exploring the cultural sites. It would be doable in 4 days, but with 5, we were able to experience everything at a much more comfortable pace, and it even gave us the chance to return to our favourite sunset spot twice!
To help you better plan your trip depending on the length of you stay, here is our recommended Mount Aso Hiking Itinerary.
Mount Aso Hiking Itinerary
- 1 Day in Mt Aso: We would do both the Mt Eboshidake and Kishimadake hike in a single day. We did it during our stay and it is very much doable. Both hikes also start from the same parking lot making it even more convenient. If you don’t have a rental car and are based in Fukuoka, you can explore these hikes on this Mt Aso Day tour.
- 2 Days in Mt Aso: Add the Sensuikyo Gorge Hike on the second day
- 3 Days in Mt Aso: Add the Classic Mt Nakdake-Takadake hike, or you can spend the day going to Kamishikimi Shrine, Takachiho Gorge, or some of the other popular viewpoints.
🚨 Don’t Miss this Japan Pass: Kyushu Rail Pass
🚆 If you won’t be renting a car, the JR Kyushu Rail Pass is one of the easiest and most cost effective ways to explore the region. The North Kyushu Pass gives you unlimited rides on JR trains, including many shinkansen and local train routes, and will cover you for visiting destinations like Fukuoka, Nagasaki, Kumamoto, Mount Aso, and Beppu without the hassle of booking individual tickets.
Which Mt Aso Hike is Best
Most travelers we met in the Aso region were only staying for 2 to 3 days, unlike us, who spent a full 5 days exploring the incredible hikes, volcanic landscapes, and viewpoints. If you’re short on time and trying to decide which hikes are worth prioritizing (we had the same dilemma even with 5 days available), these are the ones we would recommend:
Best Beginner Hike: Mt Kishimadake
If you’re new to hiking or simply looking for the easiest trail with the biggest reward, we’d recommend Mt. Kishimadake. The hike takes only around two hours to complete, follows well maintained paths with proper staircases, and is one of the most accessible hikes in the Aso region. Despite this, the views are absolutely spectacular. We loved this hike so much that we ended up doing it twice during our stay!
Best Crater Views: Sensuikyo Gorge
If your goal is to get the best views of Aso Crater, then without a doubt we’d recommend the Sensuikyo Gorge to Mt. Nakadake hike. The classic Nakadake-Takadake hike via the Sunasenri Route is another good option, but it takes nearly twice as long and involves far more challenging terrain. Since both trails ultimately lead to the same summit viewpoints on Mt. Nakadake and Mt. Takadake, the biggest difference comes down to the approach. For us, the Sensuikyo route was more suitable since we forgot to bring our hiking boots, and wanted to complete the hike in a shorter period of time so that we could go to Mt Kishimadake to admire the sunset a second time.

Best Sunset Hike: Mt. Kishimadake
For the best sunset views in Mt Aso, we would recommend Mt Kishimadake hike. It is incredibly accessible, only takes about 45 minutes to get to the summit, and it very safe to come back down even after dark. But the best part is that from the top, the sun perfectly lines up behind the iconic Komezuka Volcano to the west. We actually came back and hiked the trail a second time just to photograph this scene, and it was absolutely worth it.
To get the best sunset views, try to reach the top around 1 hour before sunset. This will give you time to fully admire the views and also do the loop trail around the crater rim. When we were there, we reached the summit at around 6:15pm and easily stayed until around 8pm.
Hardest Hike: Mt Nakadake-Takadake
If you want the hardest hike in Mt Aso, then we would recommend the Classic Mt Nakadake-Takadake hike (Susansenri Route). This hike takes on average 5-6 hours to complete, going through loose volcanic terrain and steep ridges. If you do take on this trail, make sure to go to the Mt Aso Visitor’s center first to consult regarding the conditions. There was a very kind gentlemen there who gave us a lot of recommendations for hiking routes and what we may see along the way.
Best Landscape Scenery Hike: Mt Eboshidake
This is a tough one, and highly depends on what kind of scenery you enjoy. But for us, we would say the best landscape was on the Mt Eboshidake hike. The reason is that the views constantly change, from being surrounded by pink azeleas, overlooking both Mt Aso and Kishimadake, and seeing the fuming crater. I think this hike was made even more special since we were there in spring when the azeleas were blooming. If you’re more after dramatic alien-like landscape, then we would recommend the Sensuikyo Gorge to Mt Nakadake hike.
Check out our PDF guide that includes a summary of 36 essential tips for traveling to Japan! If you want to read about all these tips in detail, check out our Japan traveling tips guide!
This post is part of our series about Japan. If you want to learn more about Japan, planning your trip, and some of the best experiences there, check out the guides below:
What to Pack for Hiking in Mount Aso
As you may know, we’re currently traveling around the world, and before heading to Japan we had actually left some of our hiking gear behind. Since our upcoming plans included destinations like the Philippines, Vietnam, and parts of China, we didn’t think we’d be tackling any serious hikes for a while. Well… Mount Aso quickly proved us wrong!
Some of the trails here are far more rugged than they initially appear, and there were definitely a few moments where we wished we had packed our hiking boots. Consider it a lesson learned on our part!
To help you avoid making the same mistake, here are the essential things we recommend bringing for your Mount Aso hikes.
Hiking Boots
This is the thing we needed the most but had left behind. Although some of the trails like Mt Kishimadake and Eboshidake can be done in sneakers, we really wish we had our hiking boots to do the Mt Nakadake-Takadake hike, and to tackle further sections of the Sensuikyo Gorge trail. Since you’ll be trekking through volcanic landscape, having good grip on shoes is crucial to prevent from slipping.
Hiking Sticks
Although we pretty much never use hiking sticks, we did see most other hikers in the region use them, especially for the more challenging hikes. They can really come in handy to prevent from losing balance and to brace yourself when descending steeper slopes with loose rocks.
Waterproof/Windproof Jacket
We got lucky with the weather during our time in Aso, but that’s not something we’d count on. Conditions can change surprisingly quickly around the volcanoes, especially once you gain some elevation. The wind at the summits can be quite strong, and rain showers can roll in with little warning. Even if the forecast looks good, we’d still recommend throwing a lightweight waterproof jacket in your bag just in case. We had great weather for the 5 days that we were there, but on the day that we left, it was pouring rain!
Sunscreen
Since you’ll be hiking at higher altitude, it is really easy to get sunburnt. Make sure to put on Sunscreen even if it doesn’t feel to hot outside.
Important Things to Know Before Hiking in Mount Aso
Can You Hike Mount Aso Without a Car?
Yes, it is possible to visit many of Mount Aso’s hiking trails using public transportation, although having a rental car will make your trip significantly easier. Buses run from Aso Station to major attractions such as Kusasenri and the Aso Sanjo Terminal, which provide access to hikes like Mt. Eboshidake, Mt. Kishimadake, and the popular Nakadake-Takadake route. However, bus schedules can be limited and may not always align well with longer hikes, especially if you plan to stay out for sunrise or sunset.
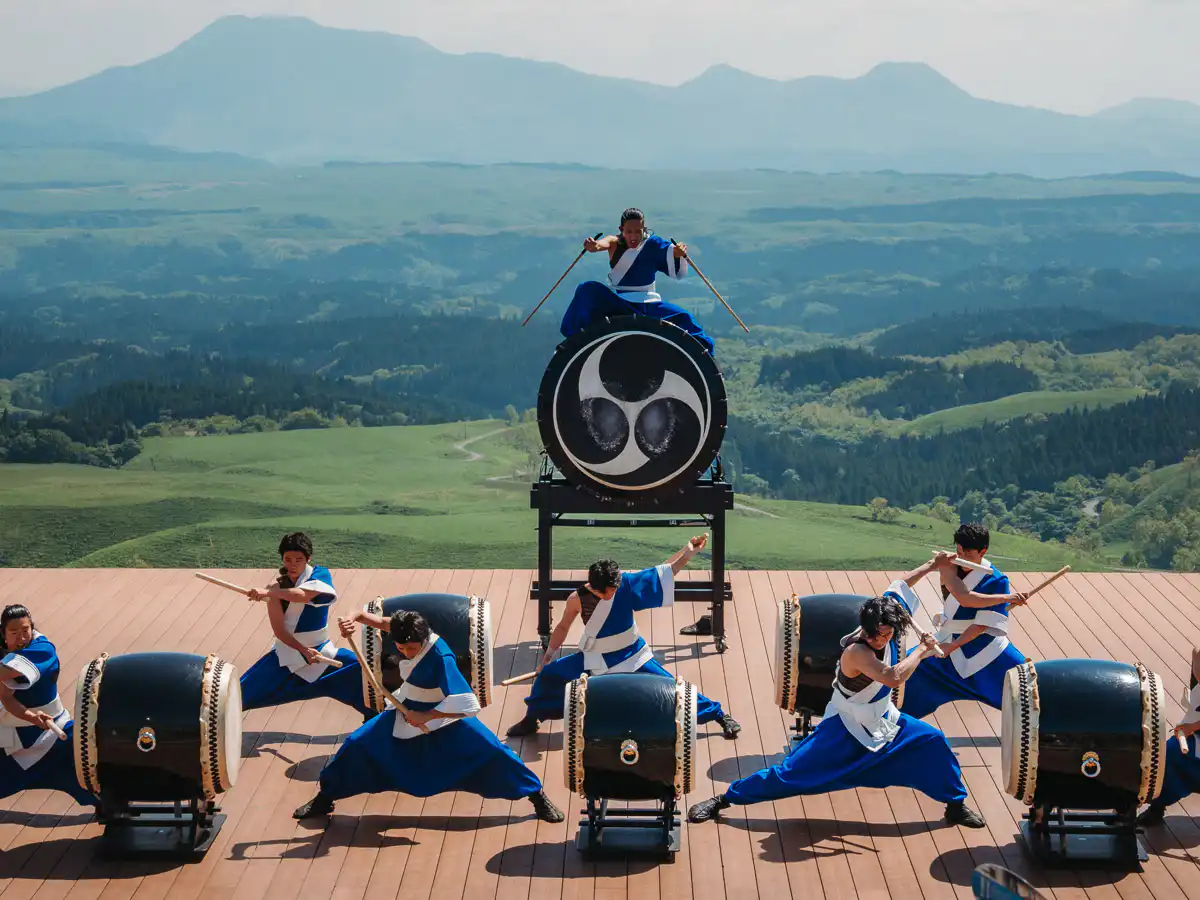
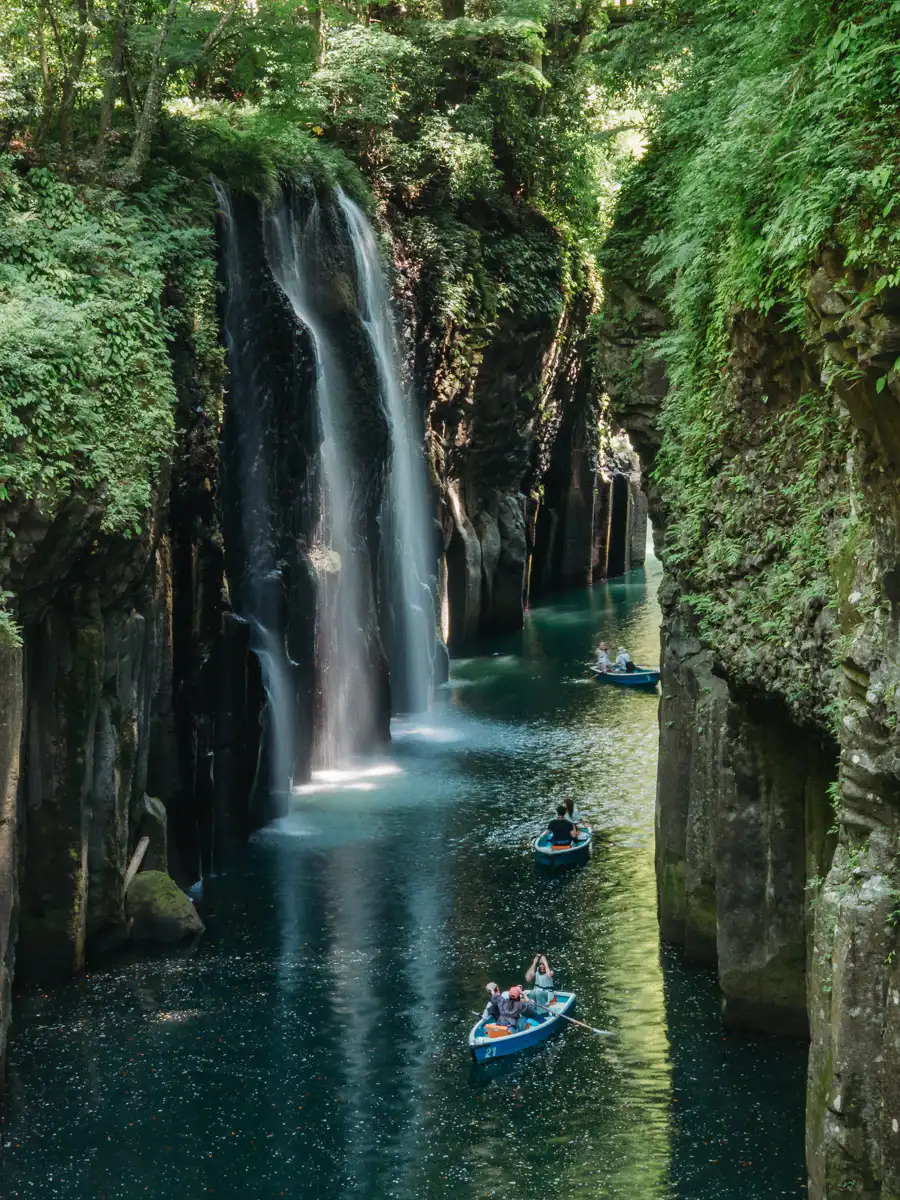
We personally rented a car and would highly recommend doing the same if your budget allows. Not only does it make accessing the trailheads much easier, but it also gives you the flexibility to explore nearby attractions like Takachiho Gorge, Kamishikimi Kumanoimasu Shrine, and the outdoor Taiko performances without having to plan your day around bus schedules.
In any case, if you’re visiting Mount Aso as part of a larger Kyushu itinerary, there’s a good chance you’ll already have a rental car. While it is technically possible to explore much of Kyushu using public transportation, we personally think you’d miss out on one of the best parts of the experience: the freedom of a road trip.
Some of our favourite moments in Kyushu came from simply pulling over at scenic viewpoints, discovering unexpected places, and being able to explore at our own pace.
Active Volcano Safety
Parts of both Sensuikyo Gorge hike and the Mt. Nakadake-Takadake hike pass through areas that may fall within the volcano’s designated hazard zone. Depending on volcanic activity, you may be exposed to volcanic gases or be within a hazard zone if ever the volcano becomes more active. We were told that if at any point we feel unwell, that we should turn back or take a route that goes further from the volcano.
There are designated routes that remain outside the 1 to 2 km exclusion zone around the crater, so you can always choose those to be on the safe side. Before setting out, we highly recommend checking with the Mt. Aso Visitor Center for the latest trail conditions, closures, and safety information.
Trail Closures
Trail closures may occur depending on the activity level of the volcano. Make sure to follow the recommendations as you will be hiking in a remote and desolate region, and rescue may be challenging.
Proper Footwear
This was a big issue for us since we hadn’t brought our hiking boots to Japan. Fortunately, we were able to find all the trails that can be accomplished without dedicated hiking footwear.
Mt Kishimadake is the easiest since it goes along paved pathways and staircases.
Mt Eboshidake is moderate, with mostly packed dirt trail and some bigger rocks.
The Sensuikyo Gorge hike to Mt Nakadake can also be done even in sneakers since the initial section is mostly staircases. However, if you continue beyond the viewpoint toward the summit of Mt. Nakadake, the terrain becomes significantly more challenging. From here, the trail follows a narrow ridgeline covered in loose volcanic rock, which requires much more care and stability underfoot. We did most of that section in our sneakers but we’d have to admit it was pretty slippery at points, so we don’t recommend it.
Finally, without proper footwear, we would not recommend doing the Mt Nakadake-Takadake hike since it is mostly along volcanic terrain with steep ascents and descents.
Big lineup of cars to the parking lot at Visitor’s center
When heading to the main parking lot of Mt Aso Visitor’s centre, you will likely get stuck in traffic. The road up is only a single lane, and since most cars are lining up to get into the parking lot, it goes at a pretty slow pace. We arrived at the Mt Eboshidake hike at around 11am and was stuck in traffic, but even at around 3pm, we still noticed there was a car lineup. Only at around 5-6pm when we were hiking up Mt Kishimadake that we noticed no more traffic jam. Just something to keep in mind so you can factor in some additional time.
Where We Stayed for Hiking in Mount Aso
For your trip to Aso, we recommend staying on the northern side of the volcano, around Aso Town or Uchinomaki.
This is especially ideal if you’ll be relying on public transportation, since you’ll be much closer to the main train station and bus connections. We also chose to stay on the northern side of Aso since it gave us easier access to the main volcano hiking trailheads, was closer to the outdoor Taiko show, and made for a more convenient drive to Beppu, which was our next stop afterwards.
During our 5 days in Aso, we decided to split our stay between 3 nights at a simple guesthouse and 2 nights at a Ryokan. Overall, we found accommodation in Aso to be a bit more expensive compared to other parts of Kyushu, and options can be somewhat limited since many places tend to book out early.
Recommended Hotels/Ryokans in Aso Region
We ended up staying at Guest House Asora, which was a simple, clean, and centrally located guesthouse, before moving over to Guesthouse Asobe 民宿 あそ兵衛 for 2 nights to enjoy a more traditional Ryokan experience.
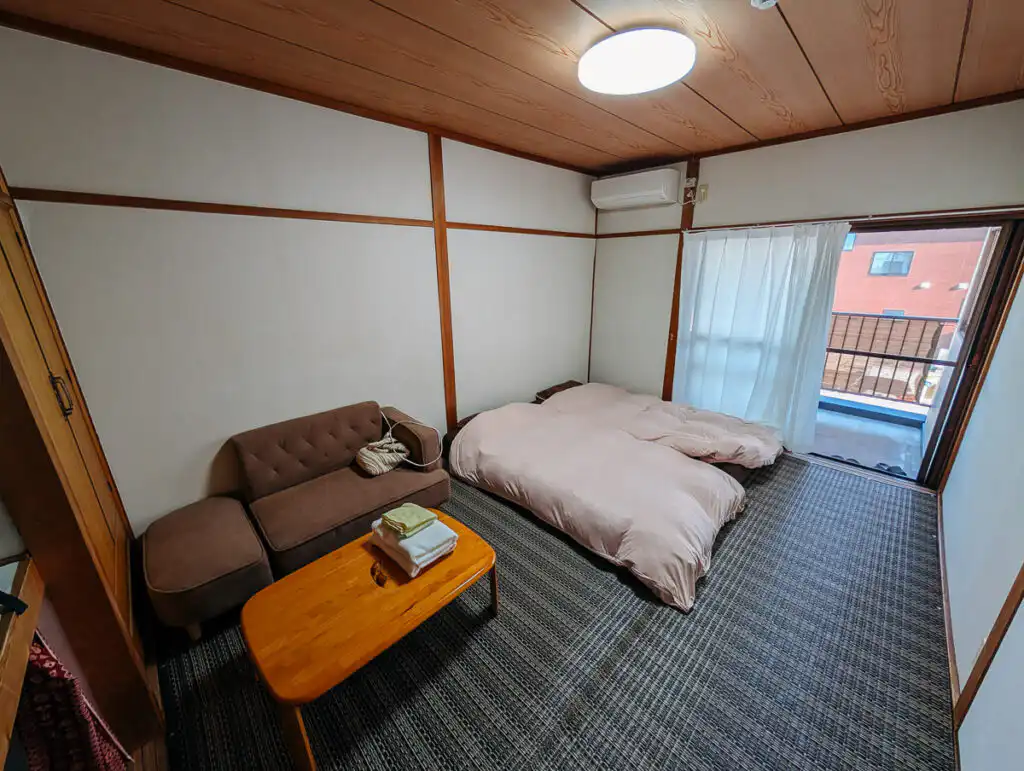 Guest House Asora
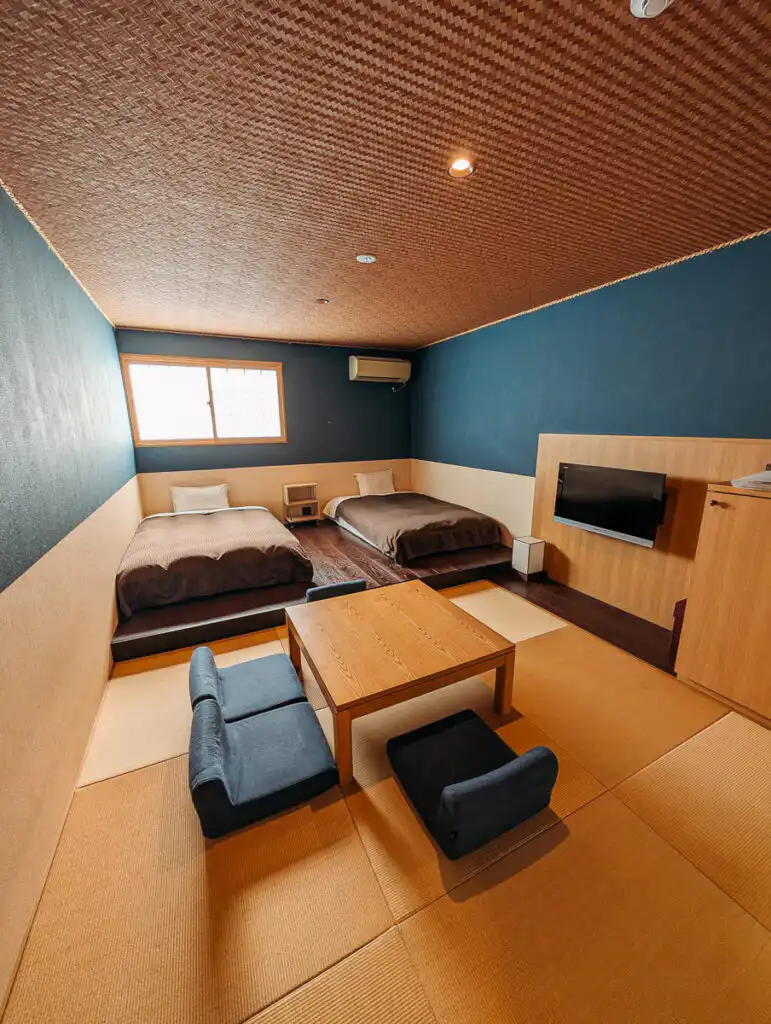 Guesthouse Asobe (Ryokan)
Another Ryokan we really wanted to stay at was Uchinomaki Onsen Yumeioiso but unfortunately, they were booked our on the dates we wanted.
Finally, if you prefer more Western style comforts over traditional Japanese tatami rooms, and want the convenience of staying right beside Aso Station, then you can also check out Fairfield by Marriott Kumamoto Aso.
Using WISE card in Japan
When taking cash out of an ATM while abroad, you will most likely be charged both a foreign exchange fee and a foreign transaction fee by that country’s ATM. With my Canadian card, this can easily be 3-4$ + 2.75% + a markup on the exchange rate charged by my bank, and then another 3-5$ charged by the foreign ATM.

This can be really costly. For this reason, we recommend using WISE card which has only minimal fees and just about no foreign currency exchange markup. This helps me save at least 5-7$ every time I take out money from an ATM. If you want to see our full review of the card showing exactly how WISE can help you save, check out our WISE Travel card Review post.
Final Thoughts: Best Hikes in Mount Aso
If there’s one thing we hope you take away from this guide, it’s that Mount Aso deserves far more attention than it gets. Before visiting, we expected to see an impressive volcano and maybe do a hike or two, but what we didn’t expect was to find some of the most unique landscapes and experiences we’ve encountered anywhere in Japan.
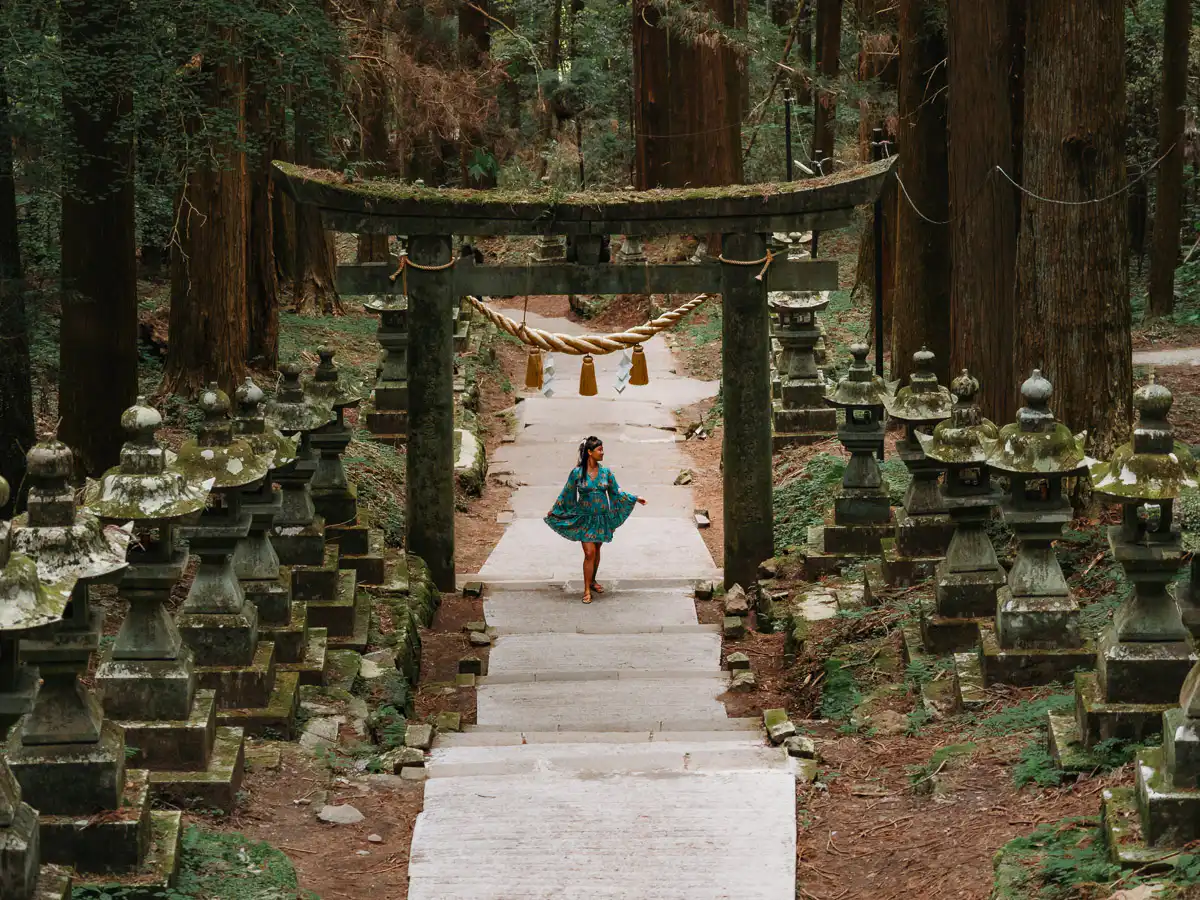
Whether you’re standing on the rim of a massive volcanic crater, hiking along rugged ridgelines, or watching the sunset behind Komezuka Volcano, Mount Aso offers an experience that feels completely different from the temples, bustling cities, and traditional sights that most travelers automatically associate with Japan. And as incredible as the hikes are, they’re really just the beginning of what Mount Aso has to offer. The region also makes a fantastic base for exploring nearby attractions like the outdoor Taiko performances, the magical forest of Kamishikimi Kumanoimasu Shrine, and the popular Takachiho Gorge. If you’re planning a trip to the area, be sure to check out our complete Mount Aso travel guide for everything you need to know.
We hope this guide helps you plan your own adventure and experience the incredible landscapes of Kyushu for yourself.